Manual Onboarding is the staff-driven path for adding a new patient directly in AveeCare. You walk a 12-section wizard from demographics through care plan and billing, and the patient lands in the Active list as soon as you click Finish.
Quick answer
Open Patients, click Add Patient at the top-left of the action bar, choose Manual Onboarding on the picker, fill the required fields on each section pill (the starred ones), then click Finish on the Review section. The new patient appears in the Active tab.
Wizard sections at a glance
The Manual Onboarding wizard has twelve section pills down the left side. You can jump between them in any order, and the form does not block you on a missing field until you click Finish on Review.
- General Information. Name, DOB, gender, address, language, office.
- Contact Information. Patient email, phone numbers, emergency and family contacts.
- Medical Information. ADLs, advance directive, DNR, diagnoses, medications, allergies, mobility, fall risk, mental health, social needs, and Service Type.
- Care Goals. Treatment objectives.
- Documents and Files. Upload intake paperwork.
- Forms. Attach custom forms or assessments.
- Notes. Free-text care notes and reminders.
- Disclosures. Required agreements.
- Platform Consents. AveeCare legal agreements.
- Billing Information. Optional payment method and billing contact.
- Other Information. Custom fields and caregiver preferences.
- Review. Read-only summary of every section, with a Finish button at the bottom.
1. Open Patients and click Add Patient
Click Add Patient at the top-left of the action bar.
It is the first button in the action bar above the Patient List card. Beside it sit Make Inactive, Delete, and Import CSV. Add Patient is always live; the middle two grey out until you tick a row.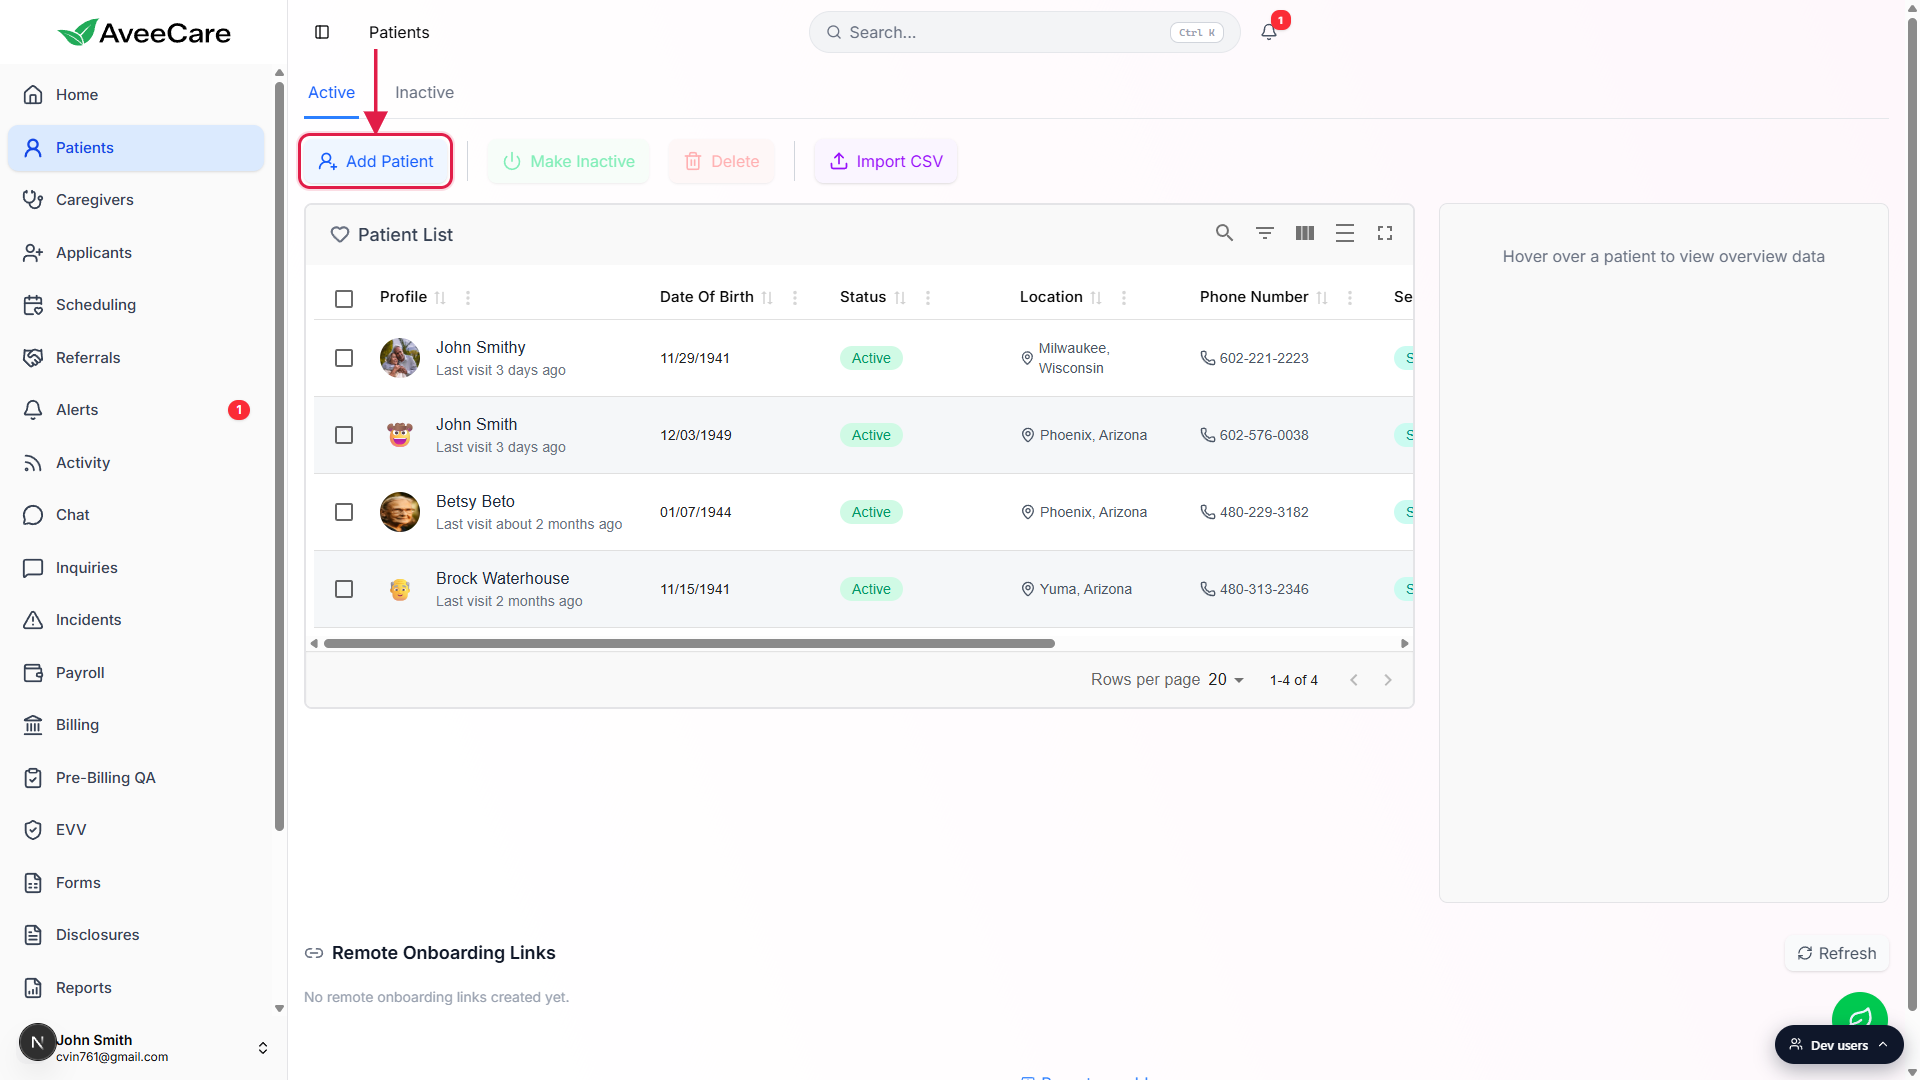
2. Pick Manual Onboarding
Choose Manual Onboarding on the Add a New Patient picker.
A picker opens with two options: Remote Onboarding (send a secure link to the patient or family) and Manual Onboarding (fill the form yourself). Click the Manual Onboarding card to start the staff-driven wizard.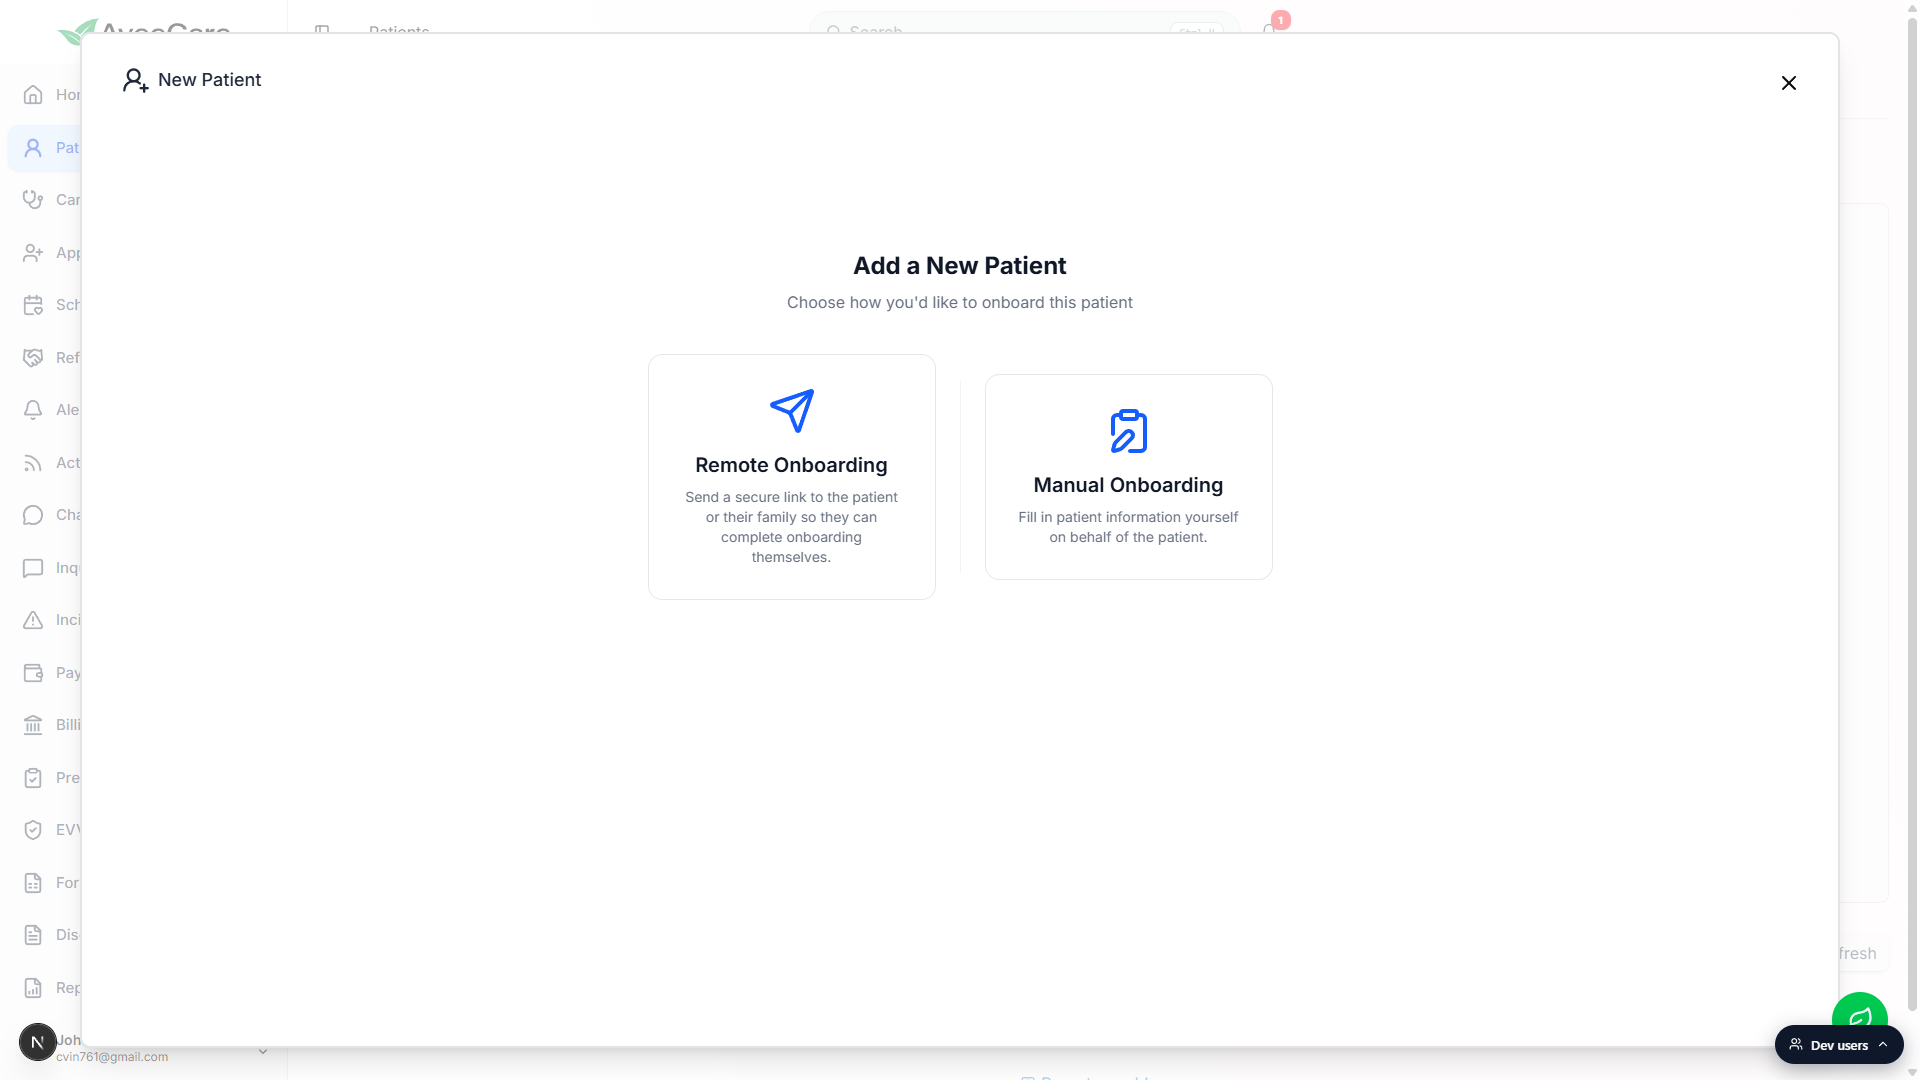
3. Fill General Information
Fill the starred fields: First Name, Last Name, Date of Birth, Gender, Address, City, State, Zip Code, and Primary Language.
You can also set Middle Name, a Goes By nickname, Building or Room number, Preferred Caregiver Gender, and the Office or Location the patient belongs to. Date of Birth feeds the age computation on the patient header and many compliance reports, so check the year before you move on.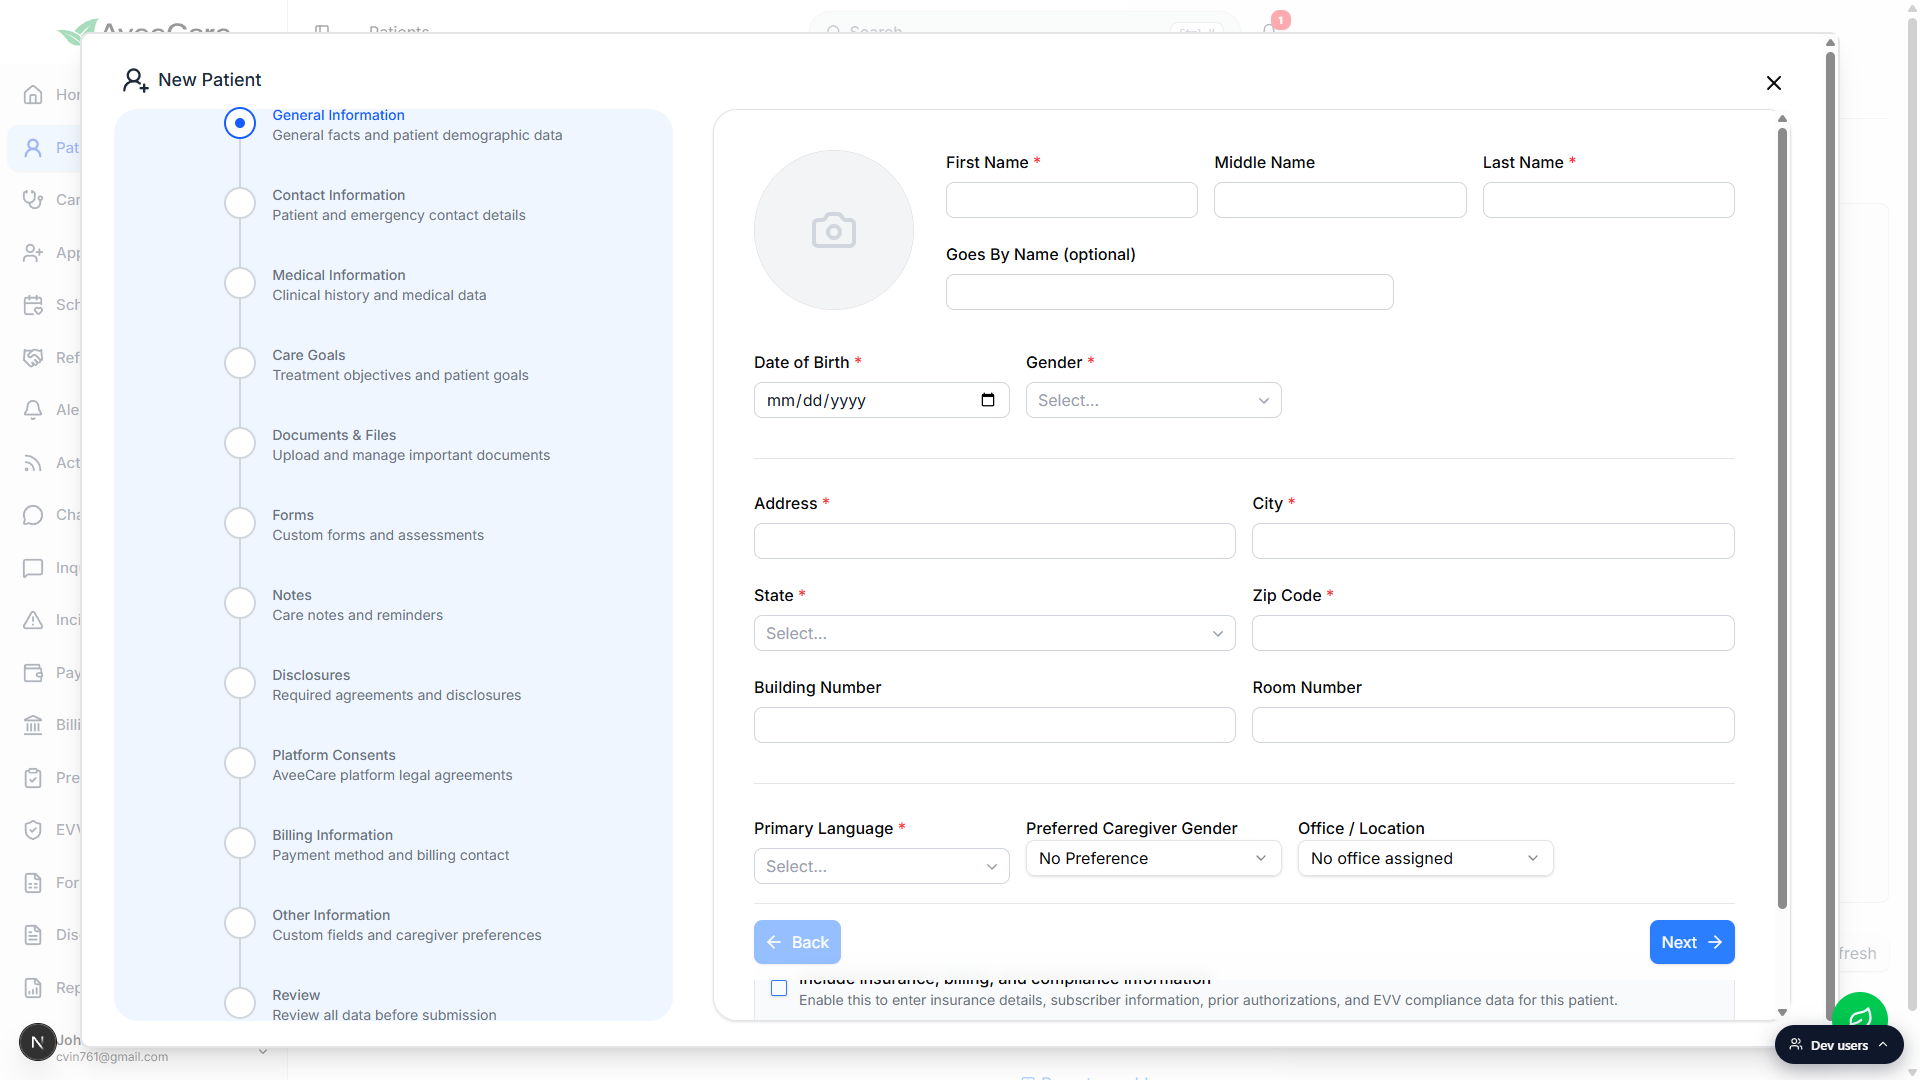
Decide whether to flip the Include insurance, billing, and compliance information toggle.
The checkbox at the bottom of General Information adds extra fields for insurance details, subscriber information, prior authorizations, and EVV compliance to the wizard. Leave it off for private-pay patients; flip it on if the patient is Medicaid, Medicare, or covered by long-term care insurance.Click Next, or click any pill on the left to jump to a section.
The wizard does not block you on missing required fields until you try to Finish on the Review section, so you can hop around. The Back button is disabled on the first section.
4. Walk Contact, Medical, and Care Goals
On Contact Information, set Patient Email Address and add at least one phone number.
Add Phone lets you stack multiple numbers (Mobile, Home, Work, whatever you label them). The Contact List card below is for family, friends, and emergency contacts. Each contact takes a Name, Phone Number, Email, and Relationship to Patient, plus checkboxes for Prefer Email and Emergency Contact. Tap Add Contact to add another.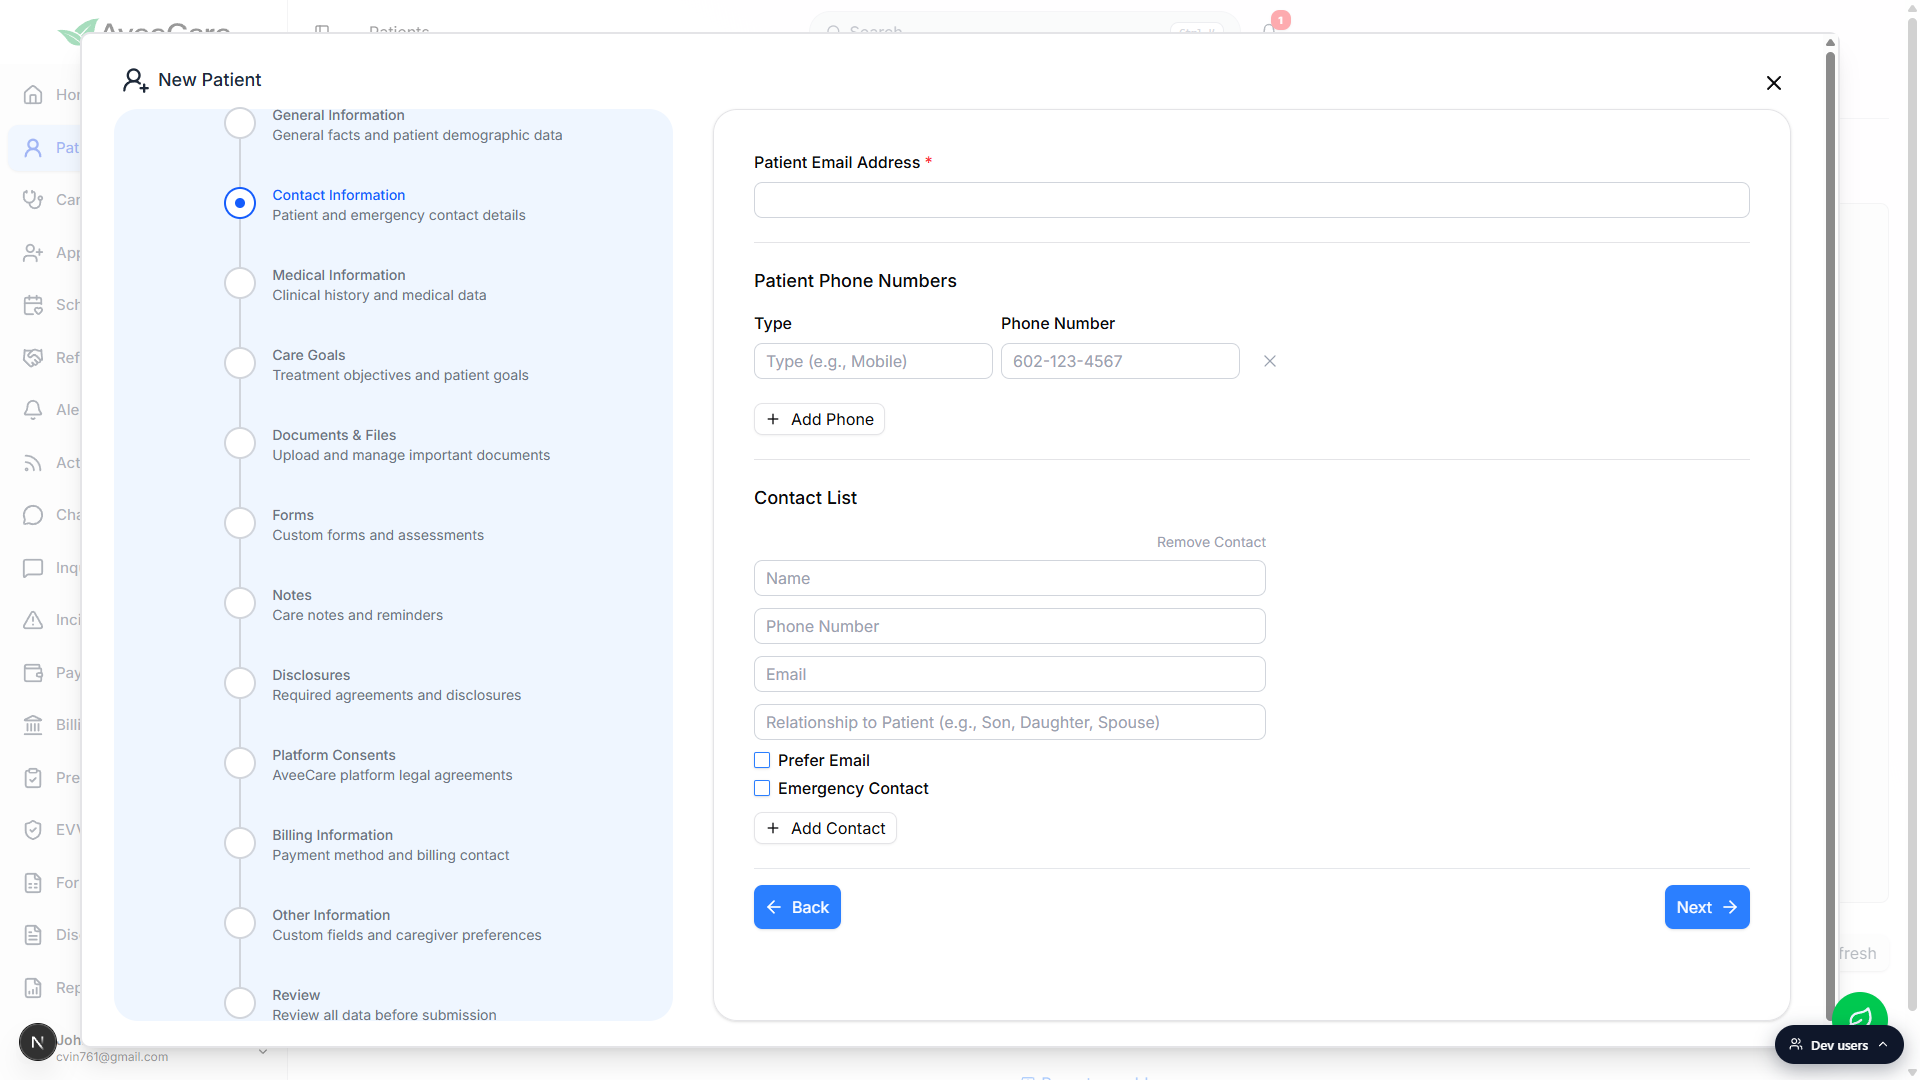
On Medical Information, capture ADLs, diagnoses, medications, allergies, and the Service Type.
The Service Type radio chooses one of Standard Care, Skilled Nursing, Physical Therapy, or Hospice. It drives default scheduling and billing behavior, so pick the one that matches your day-to-day care for this patient. Advanced Directive and DNR each have a Required checkbox if the patient has one on file.On Care Goals, document treatment objectives in plain language.
Care Goals is a free-text section. Caregivers see what you write here on the patient overview, so write it for the people who will be doing the visits.Use Documents and Files, Forms, Notes, Disclosures, and Platform Consents as the patient situation calls for.
These five sections are optional during onboarding. You can upload intake paperwork, attach custom assessments, jot clinical notes, capture required disclosures, and accept the AveeCare platform legal agreements. Anything you skip can be added later from the patient record.
5. Set up billing (or skip for later)
Open the Billing Information section.
The header reads Patient Billing Setup, with copy that confirms Payment setup is optional during onboarding and can be configured later from the patient's billing tab. The wizard will not block Finish if you leave this section empty.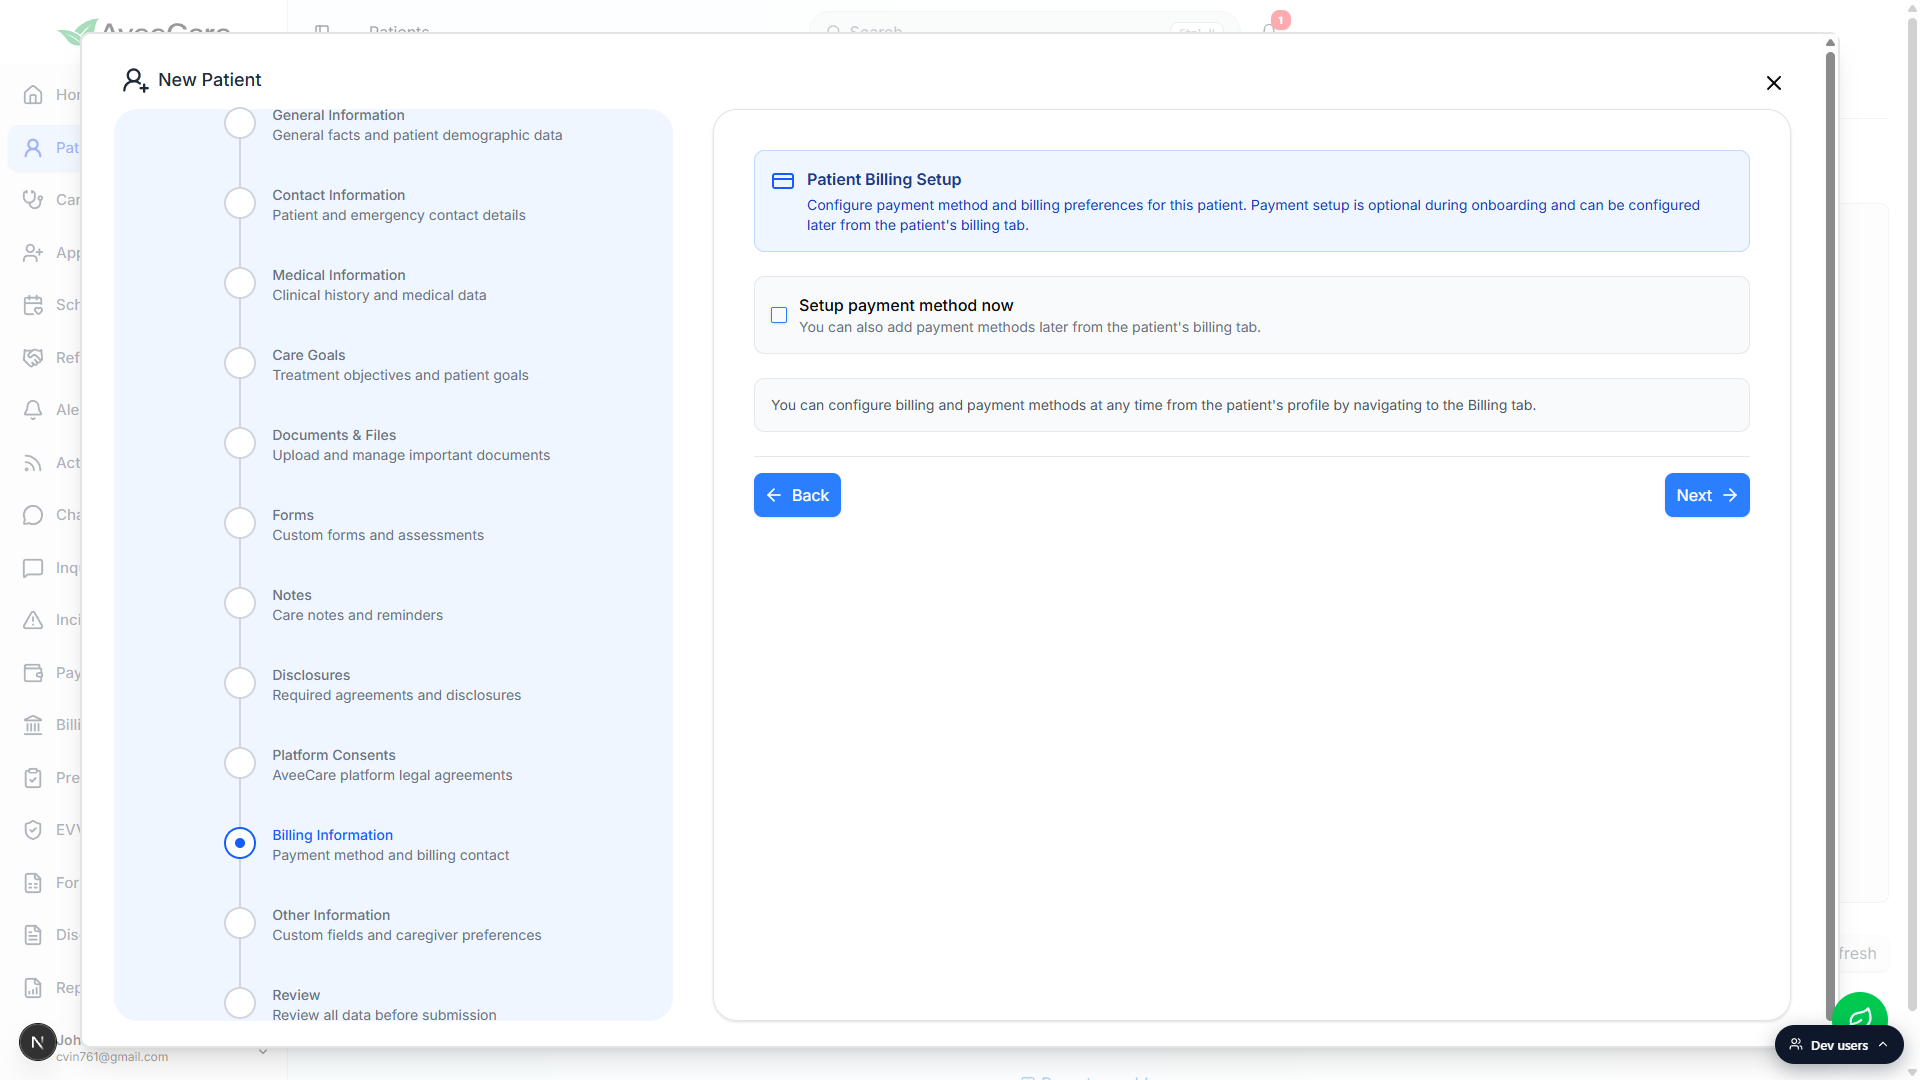
Tick Setup payment method now if you want to capture a card during onboarding.
Leave it off and you can wire up payment later from the patient profile to Billing tab. Either way, the patient record is created the moment you Finish.
6. Review and Finish
Click the Review pill at the bottom of the section list.
Review is a read-only summary of every section. Anything you left blank shows as Not Provided in red so you can spot gaps before saving. Use the section pills on the left to jump back and fix any missing required fields.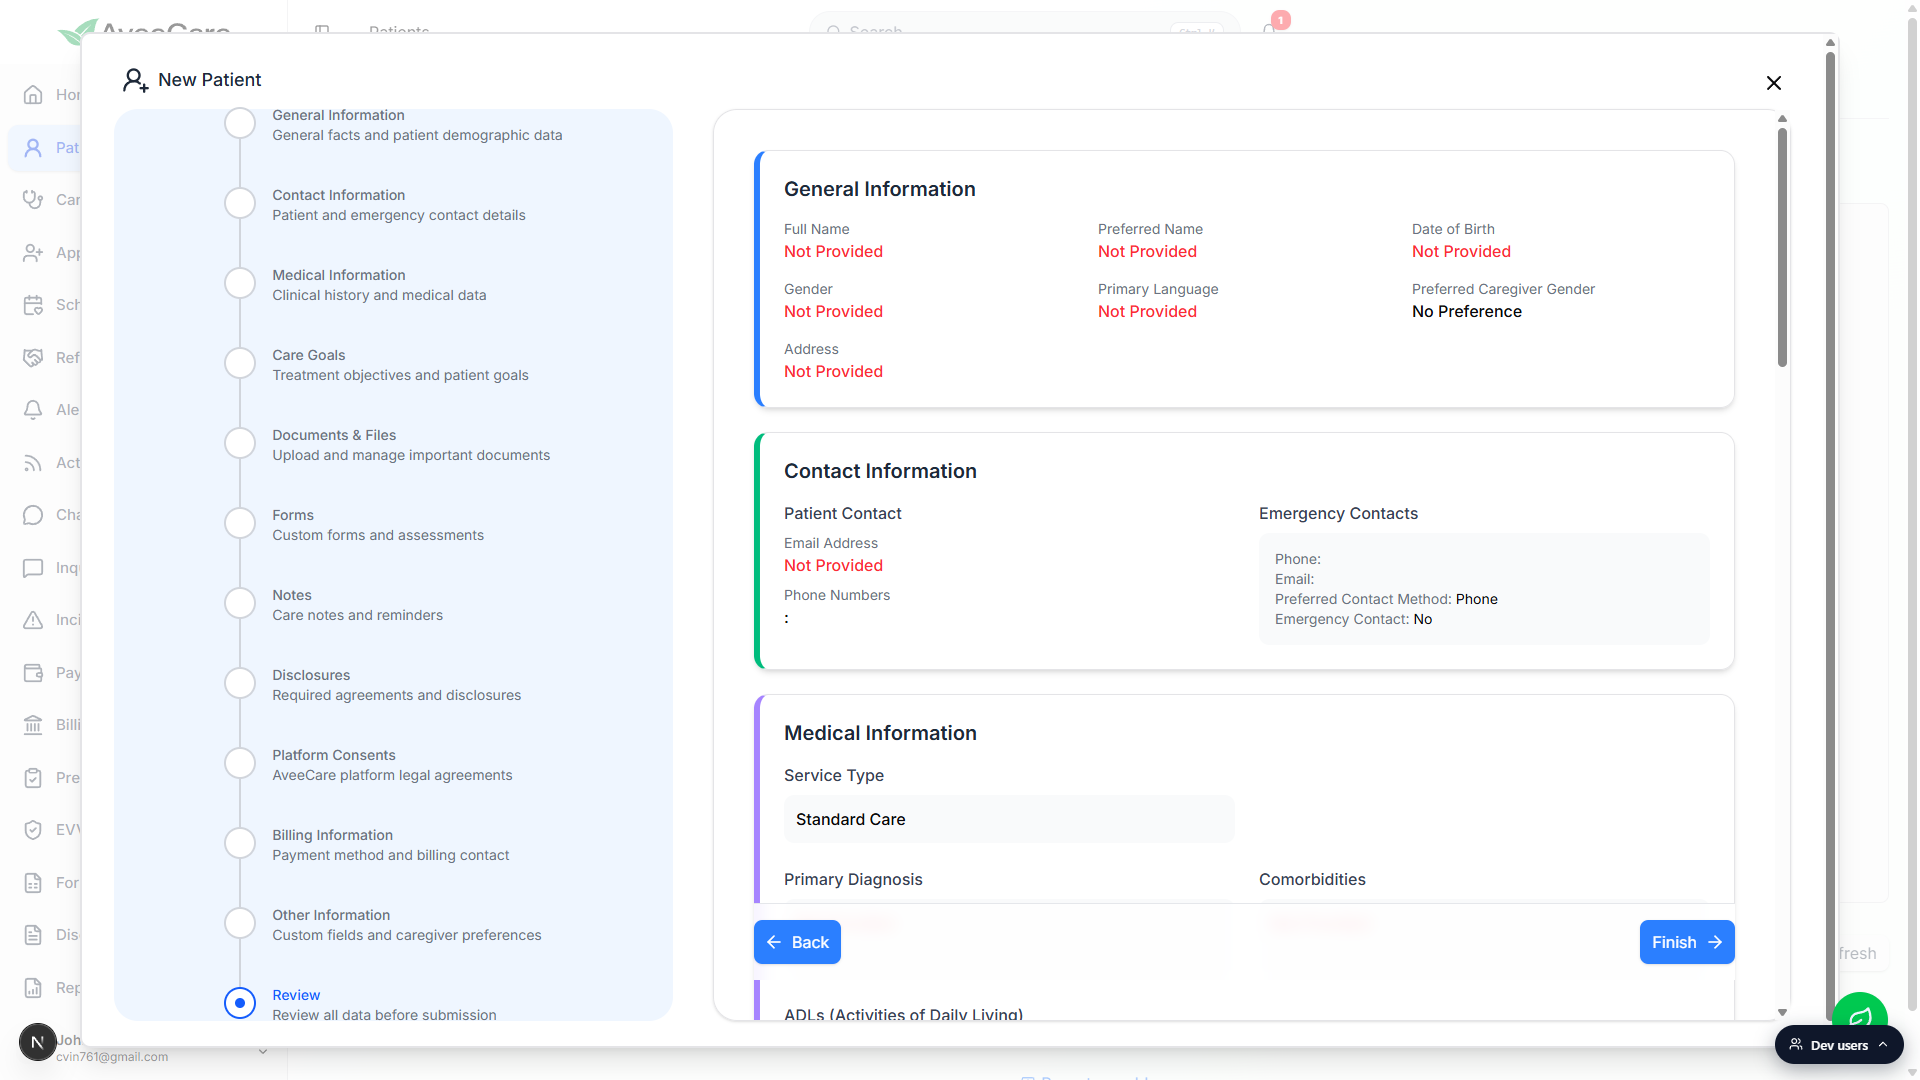
Click Finish to create the patient.
The wizard closes and the new patient lands in the Active tab of the Patients table. Open the patient row to add an emergency contact in the Contacts tab or schedule a first visit from the Appointments tab.
Common pitfalls
- Wrong year on Date of Birth. Many compliance reports lean on the patient's computed age, and the Review screen will not catch a typo. Double-check the year before you Finish.
- Forgetting to flip the Include insurance toggle. The insurance, payer, prior auth, and EVV fields only appear after you tick that checkbox on General Information. If the patient is on Medicaid or Medicare, switch it on before you start filling the rest.
- Skipping the Service Type. Without a Service Type on Medical Information, scheduling and billing have no rate to bill against. Pick Standard Care, Skilled Nursing, Physical Therapy, or Hospice before Finish.
- Empty Address. The activity map and EVV both rely on the patient's residential address. An empty address breaks location-based features and exports.
- Treating Billing as required. Patient Billing Setup is optional during onboarding, so if you do not have payment info handy, leave it for later. Do not block the patient record on chasing a card number.
- Not checking Review before Finish. Anything missing shows as Not Provided in red on the Review summary. A 30-second scan there saves a five-minute fix later.