Caregivers can snap a photo of paperwork, a wound (with consent), a medication label, or any other document straight into a visit or patient record from inside the AveeCare mobile app. The mobile shell wraps the same web app the office uses, so the photo lands on the same Files surface office staff already know.
Quick answer
Open the visit on your phone, scroll to Files (or open the patient's Files tab), tap Select Files, and pick Take Photo or Video from the iOS or Android chooser. Snap the photo, tap Use Photo, then tap Upload to commit it. The photo attaches to the record and syncs to the office in real time.
How photos work in the mobile shell
AveeCare's mobile app is a native shell that hosts the AveeCare web app in a WebView. There is no separate in-app camera. When the web app shows a file input that accepts images, iOS and Android open their built-in chooser. That chooser is the one with Photo Library, Take Photo or Video, and Choose File rows on iOS, and the equivalent Camera and Files options on Android. The benefits:
- No separate camera UI to learn. Caregivers use the same camera they already know from their phone.
- Same storage as every other file. Photos land in AveeCare's S3 buckets through the same upload path the office uses on the desktop, so HIPAA controls, retention, and access rules all match.
- Works offline-aware. If the device is offline when you tap Upload, the photo sits in the device's outbound queue and uploads as soon as the connection comes back. The visit record shows the photo locally so you can keep working.
- 10 MB default per file. Most phone photos come in under 5 MB once iOS or Android compresses for upload, so the default cap is fine. Patient and caregiver Files screens raise it to 50 MB for occasional scans.
1. Grant camera access the first time
Tap OK on the iOS or Android camera permission prompt.
The first time you pick Take Photo or Video from the chooser, iOS or Android asks the AveeCare app for permission to use the camera. On iOS the prompt reads “AveeCare” Would Like to Access the Camera with a short rationale. Tap OK. On Android 13+ you get a similar runtime prompt for the CAMERA permission.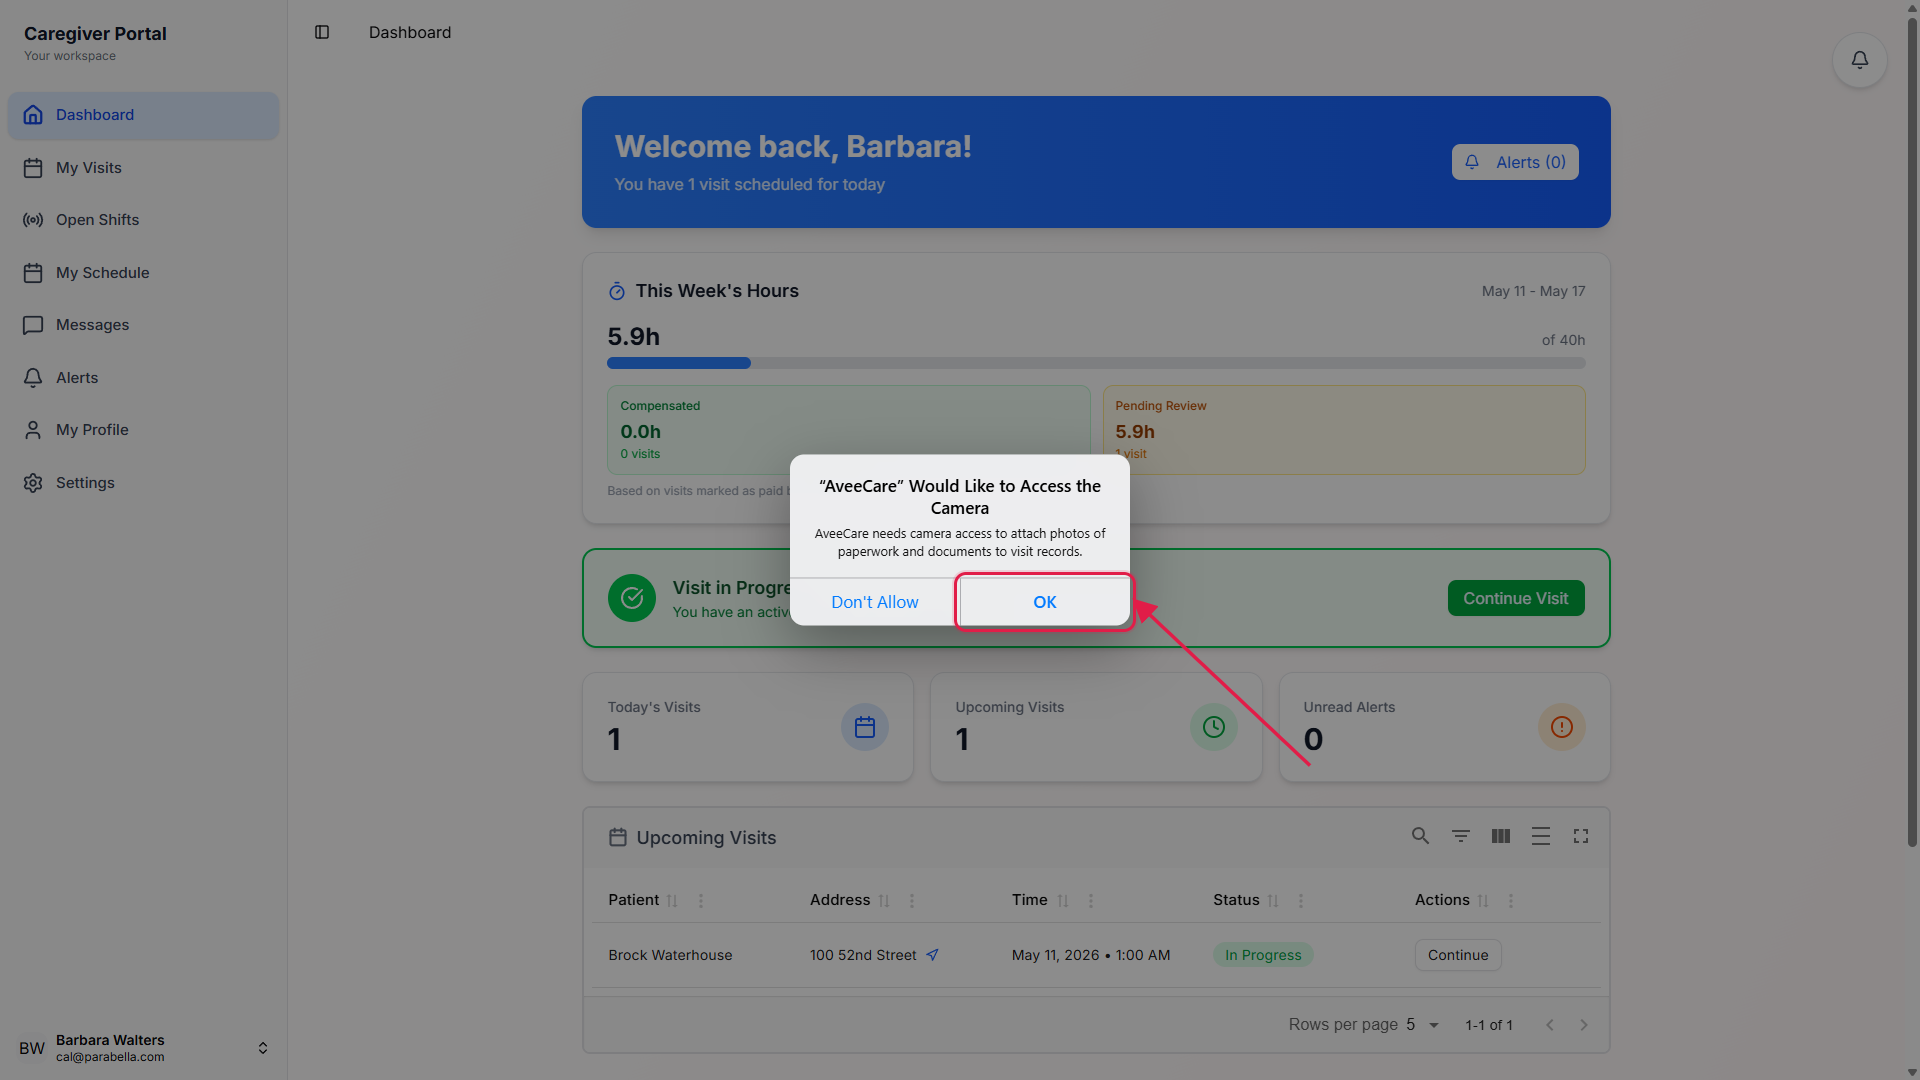
If you tap Don't Allow, you can still upload from your photo library.
The chooser still shows Photo Library and Choose File, so you can pick an existing photo or scan. To turn camera access back on later, open the OS Settings app, find AveeCare, and flip Camera on. The in-app chooser does not deep-link to OS settings for this permission, so the caregiver does have to walk to OS Settings themselves.
2. Open the file picker and pick Take Photo
On the visit detail or patient Files tab, tap Select Files.
Files lives in two places: the patient's Files tab (for items tied to the patient long-term, like ID scans and care plans) and the visit detail's Files panel (for items captured during this shift). The upload button is the same in both places.Pick Take Photo or Video from the system chooser.
iOS opens a sheet from the bottom of the screen with three rows: Photo Library, Take Photo or Video, and Choose File. Pick the middle one to launch the camera. Android opens a similar chooser with Camera and Files apps listed.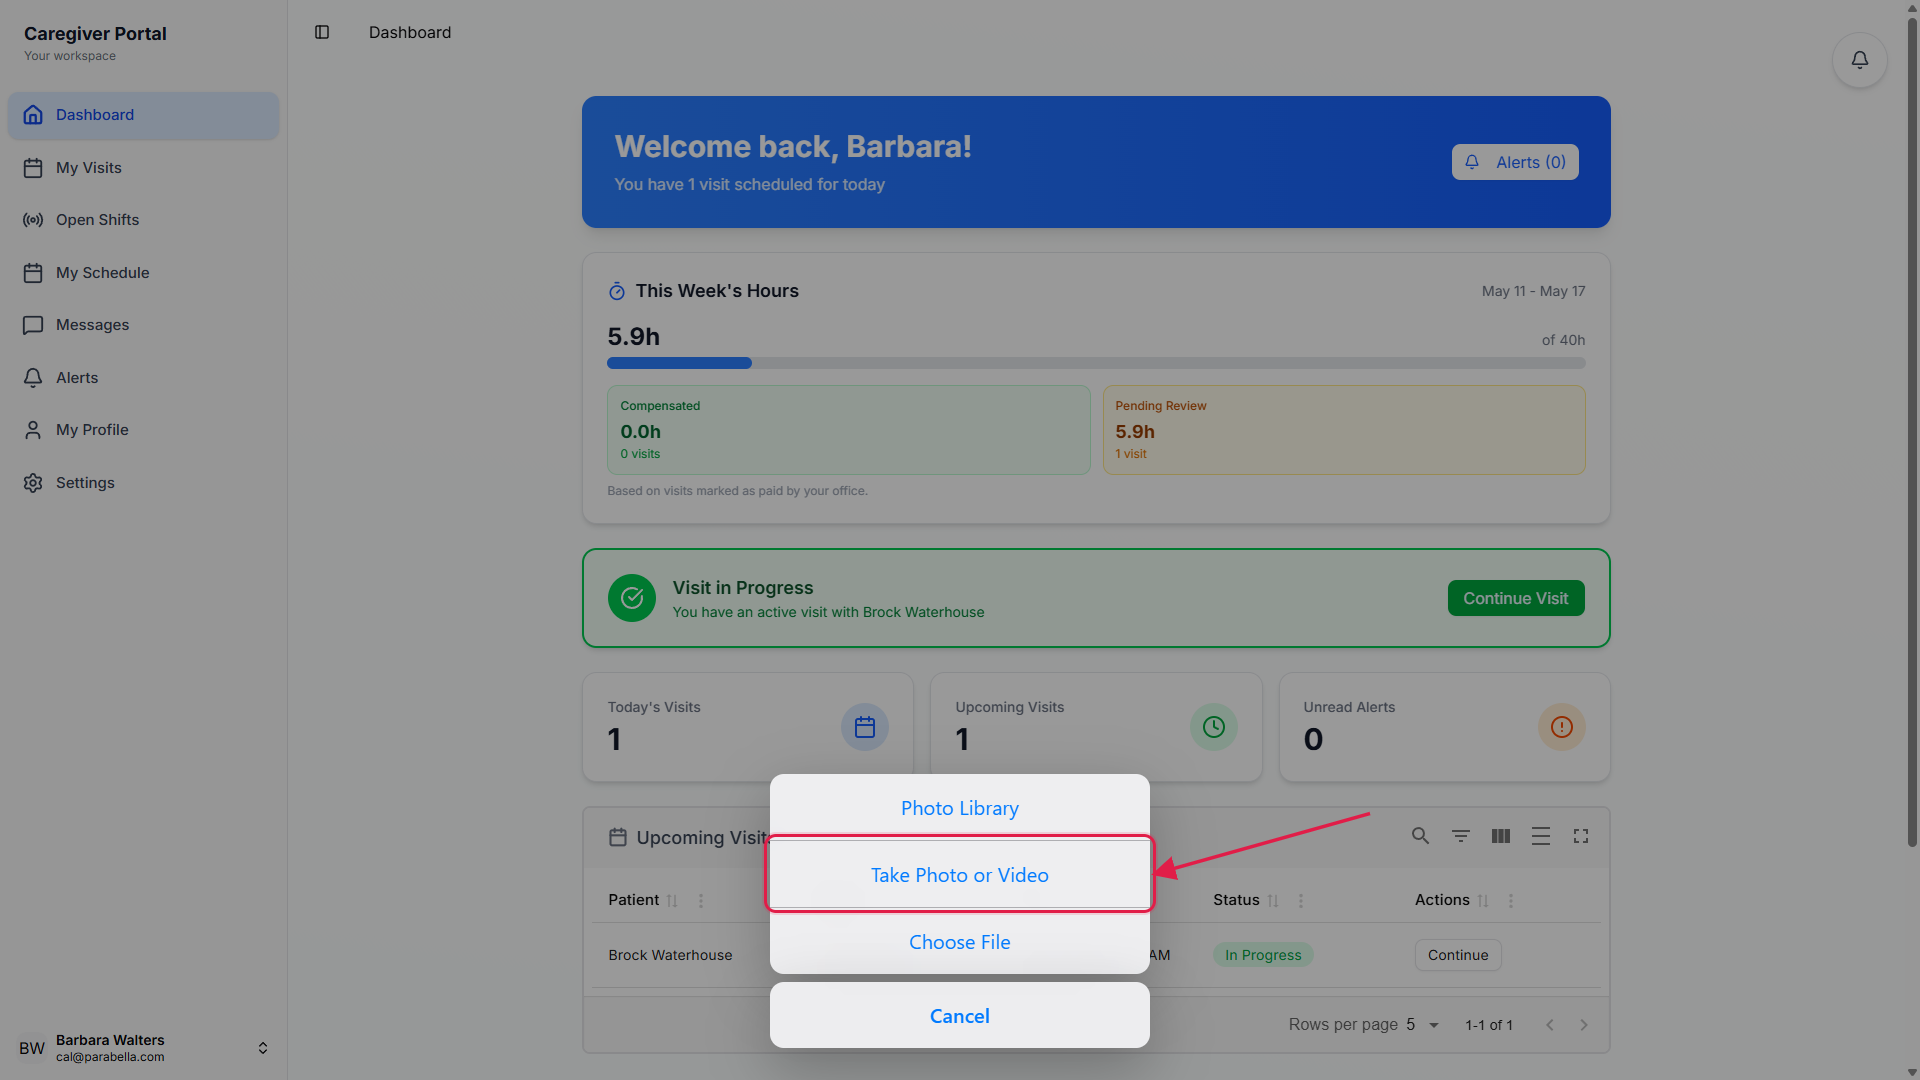
Frame the shot, tap the shutter, tap Use Photo.
The native camera takes over. Tap the shutter, review the preview, then tap Use Photo on iOS or the check mark on Android. The chooser closes and the photo shows up in the Selected Files list, ready to commit.
3. Confirm the photo attached to the visit
Tap Upload to commit the photo.
Selecting the photo only stages it. Tap Upload 1 file(s) to commit it. The button shows the count so you can batch several before upload. The file moves into the uploaded list above with an Attached badge.See the attached photo with file name, size, and uploader.
Every uploaded photo shows up as a row with a thumbnail, the original file name, the MIME type, the file size, and the uploader's name. Office staff see the same row on the visit detail and on the patient Files tab on the desktop app, so the record is unified.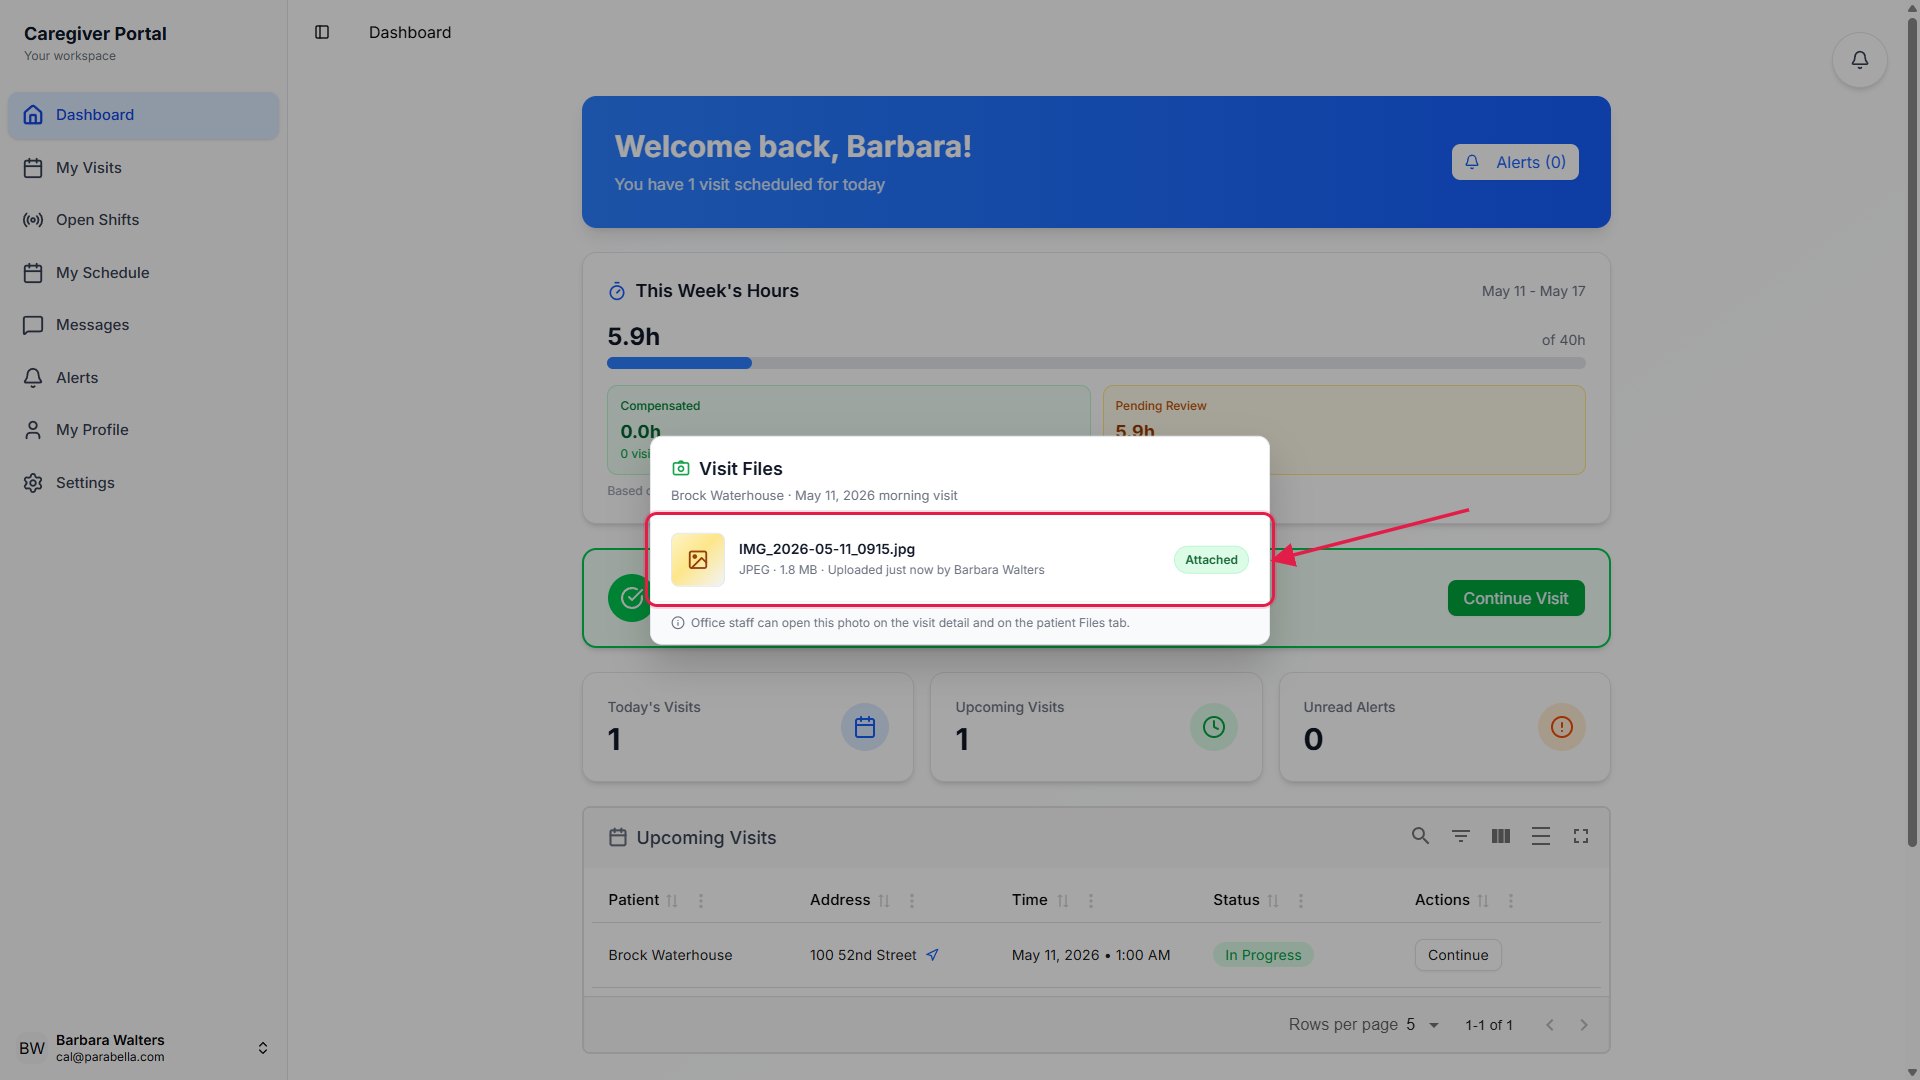
Photos belonging to the patient live on the patient Files tab too.
Files captured on a visit can be visible from the patient Files tab when the office staffer chooses to roll them up to the patient record. ID cards, insurance cards, and care plans are usually uploaded directly to the patient Files tab so they outlive any single visit.
4. Delete or replace a photo if needed
Use the X on a staged file to remove it before Upload.
The Selected Files list shows a small X next to each staged file. Tap it to drop the file before you commit. Nothing leaves the device until you tap Upload.Use the trash icon on an uploaded row to delete a committed photo.
On the uploaded list, each row has view, download, edit metadata, and delete actions. Tap the trash icon and confirm to remove the photo. Deletes are audit-logged on the visit and patient activity timelines, so the office still has a record that the file existed and was removed.Re-take a bad shot by deleting and uploading again.
There is no in-app edit or rotate today. If the photo is blurry, too dark, or framed wrong, delete it and re-take using the same Select Files flow. The chooser remembers that you granted camera permission, so it goes straight to the camera the next time.
Common pitfalls
- Selecting is not uploading. Tapping Take Photo and accepting the shot only stages the file in the Selected Files list. The photo is not on the server until you tap Upload. Caregivers who close the screen at this point lose the photo.
- Dismissing the camera permission with Don't Allow. The in-app chooser does not deep-link to OS Settings to fix this. The caregiver has to open the OS Settings app, find AveeCare, and flip Camera on by hand. Photo Library access is a separate permission, so even with Camera denied you can still upload existing pictures.
- Wound photos without documented consent. AveeCare stores the photo securely, but your agency policy decides whether wound or body photos are even allowed and how consent is recorded. Confirm the policy with your office before you snap the first wound photo.
- Uploading PHI in the file name. iOS and Android sometimes prepend location or date strings to the file name. That metadata is fine, but if a caregiver renames a photo to something like “PatientLastName_SSN.jpg” before upload, that name persists in the audit log. Stick to neutral file names.
- Counting on photos for clinical documentation. Photos supplement the visit note, they do not replace it. A medication count photo is a useful backup, but the structured fields on the visit note are still where billing and clinical review look. Fill out both.