The EVV Records table on the EVV page is where every completed visit lives once it crosses the EVV gate. Fourteen columns spell out who, when, where, and how the visit was verified. Per-row actions let you view, validate, or override one visit at a time. A bulk action bar appears the moment you check rows, and the export controls render a file in whichever of the nine state-aggregator formats your contract uses.
Quick answer
Open EVV. The EVV Records table renders below the filter row and the Status chip row. Read the row, click the eye icon for full details, click Validate or Override on the row to act, or check the row checkboxes and use the bulk Export Selected button. Format is set in the filter strip up top.
The 14 columns, left to right
The EVV Records table ships with these columns:
- Visit Date. MM/DD/YYYY. Sorts newest first by default.
- Patient. Click the name to jump to the patient profile.
- Caregiver. Click the name to jump to the caregiver profile.
- Service Code. The HCPCS or state-specific code billed for this visit (T1019, S5125, and so on).
- Time In. Actual clock-in time, not scheduled.
- Time Out. Actual clock-out time, not scheduled.
- Duration. Computed from actual start and end. Format like 2h 3m.
- Gps. Green pin if the caregiver mobile app captured GPS at clock-in or clock-out, red pin if neither was captured.
- Signature. Green pen if a caregiver signature was captured, faded pen if not.
- Verification. The patient verification method captured at clock-out (PIN, Voice, Signature, and so on).
- Audit Status. A colored pill matching the Status chip row: Pending, Validated, Flagged, Overridden, or Exported.
- Flags. Green check if heuristics passed. Red triangle with a count if any rules fired. Click the count to expand the row and read each flag.
- Ai. Faded brain when the AI pass has not run, blue spinner while running, green check if the AI agrees the visit is fine, amber alert if it confirms a real concern.
- Actions. Eye icon for full visit details, plus a green Validate link on Pending rows or an amber Override link on Flagged rows.
1. Read the 14 columns of EVV Records
The table sits below the Status chip row on the EVV page.
The table title reads EVV Records (N) with the live count of visits matching your current Date Range and Status filters. Sorting defaults to Visit Date descending. Page size defaults to 25 with a 1-of-N counter in the bottom right.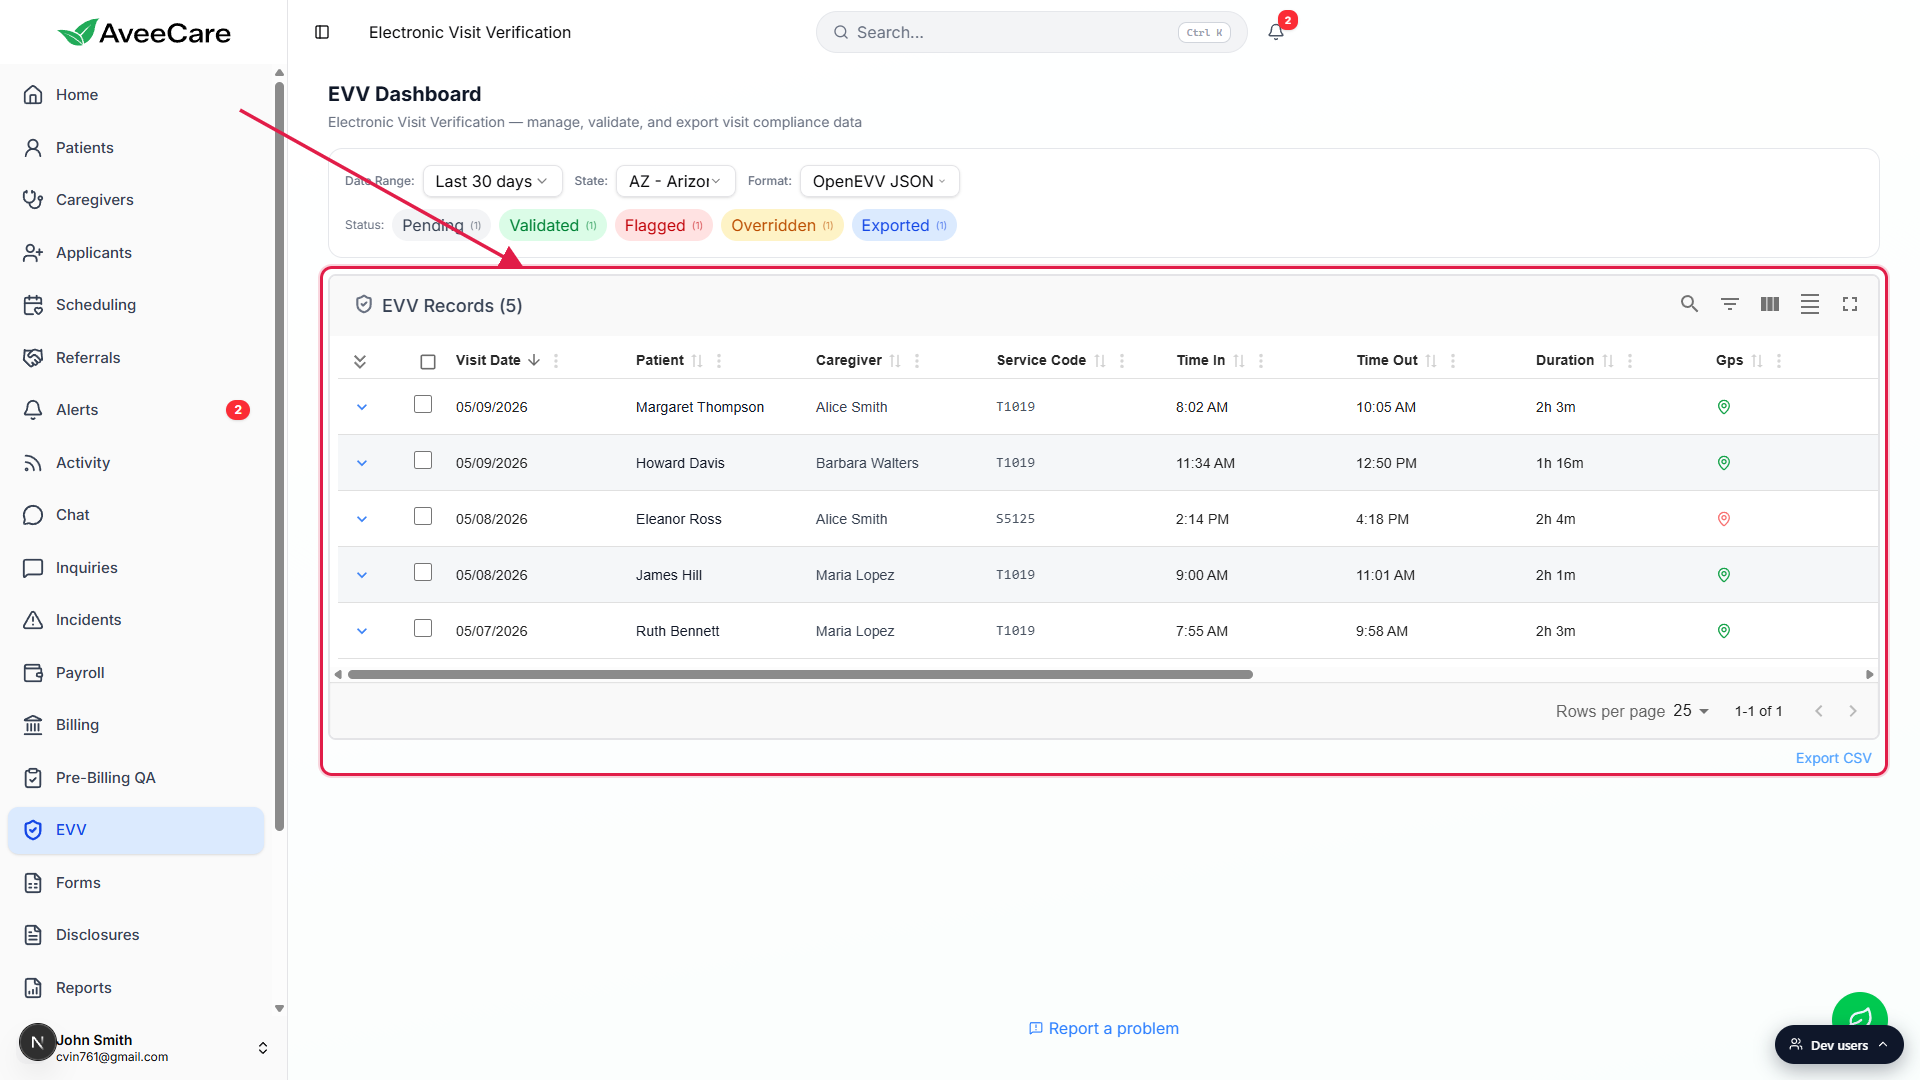
Scroll the table horizontally to see Signature, Verification, Audit Status, Flags, Ai, and Actions.
On a 1920-wide screen the first nine columns fit by default. The remaining five sit to the right of the horizontal scroll bar that appears at the bottom of the table. On mobile the less-essential columns are hidden by default and the table collapses to Visit Date, Patient, Caregiver, Audit Status, Flags, and Actions.
2. Use the per-row View, Validate, and Override actions
Click the eye icon in the Actions column to open Visit Details.
A full-screen Visit Details modal appears with the scheduled and actual clock times, GPS coordinates for clock-in and clock-out, caregiver and patient signature status, the verification method, exception and reason codes, the full flag list with descriptions, the AI concerns list when present, plus an Edit Visit button if you need to fix data.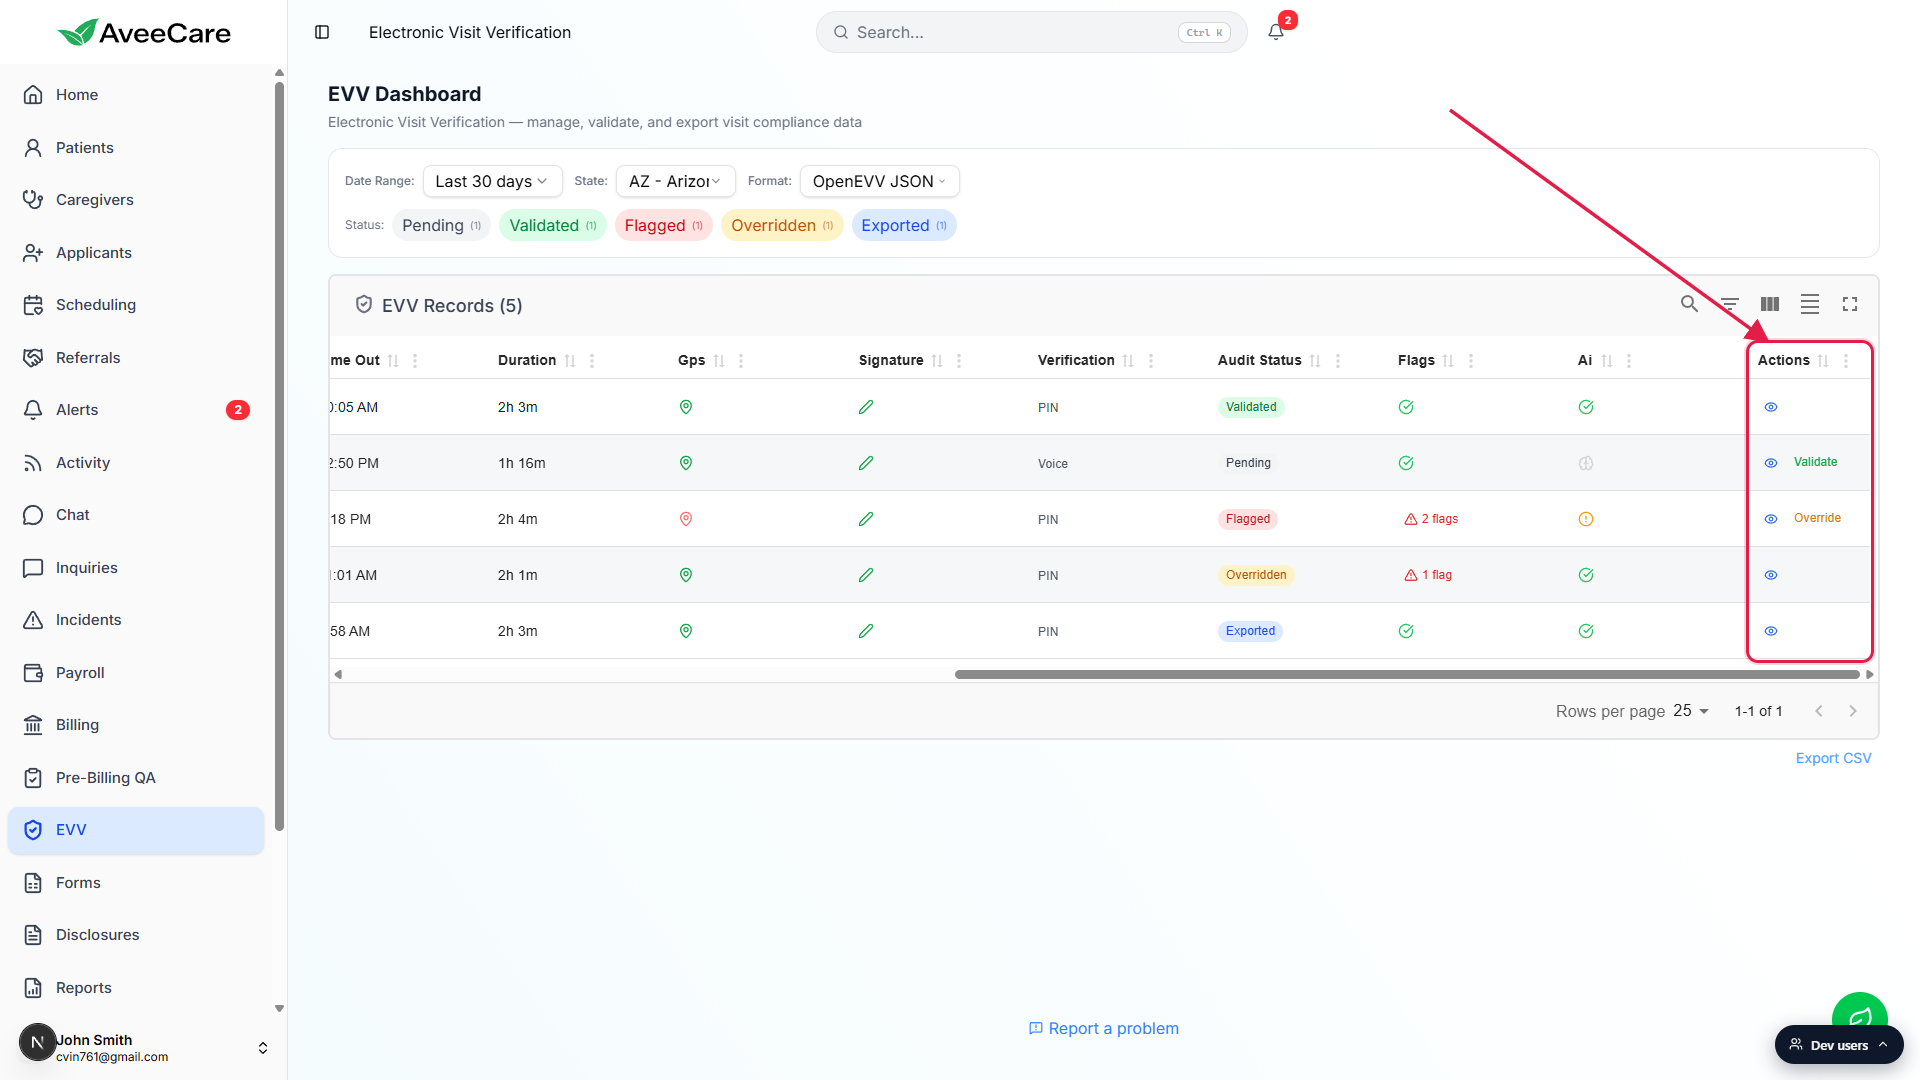
Click the green Validate link on Pending rows to validate one visit.
Validate re-runs the state heuristics against the visit. If they pass, the row flips to Validated. If a rule fires, the row flips to Flagged with the offending flag codes attached, which is why the Validate link is honest about what it actually does rather than blindly marking the row green.Click the amber Override link on Flagged rows to acknowledge and proceed.
A small dialog asks for an Override Reason from six choices: Administrative correction, System error, GPS malfunction, Patient consent issue, Scheduling conflict, Other. Pick one, click Override, the row flips to Overridden status. Your email, the timestamp, the override reason, and the original flag codes all land in the audit log.
3. Pick a row set and use the bulk action bar
Check row checkboxes on the left edge of the table.
Each row has a checkbox in the leftmost column (next to the expand caret). The header checkbox selects every row on the current page. Once at least one box is checked, a thin bulk action bar appears in the filter card above the table.Use Validate Selected to validate the batch.
The bulk Validate runs the same heuristics as the per-row Validate link, just batched. Successful rows flip to Validated, rule-firing rows flip to Flagged. A toast at the end reads how many of each. AI validation also kicks off in the background for any rows that landed in Flagged status.Use Export Selected to push the batch to a file.
Export Selected fires the export pipeline against the rows you have checked, using the Format dropdown value up top. The file downloads to your browser, and successfully exported rows flip to Exported status with the timestamp and format saved to each row.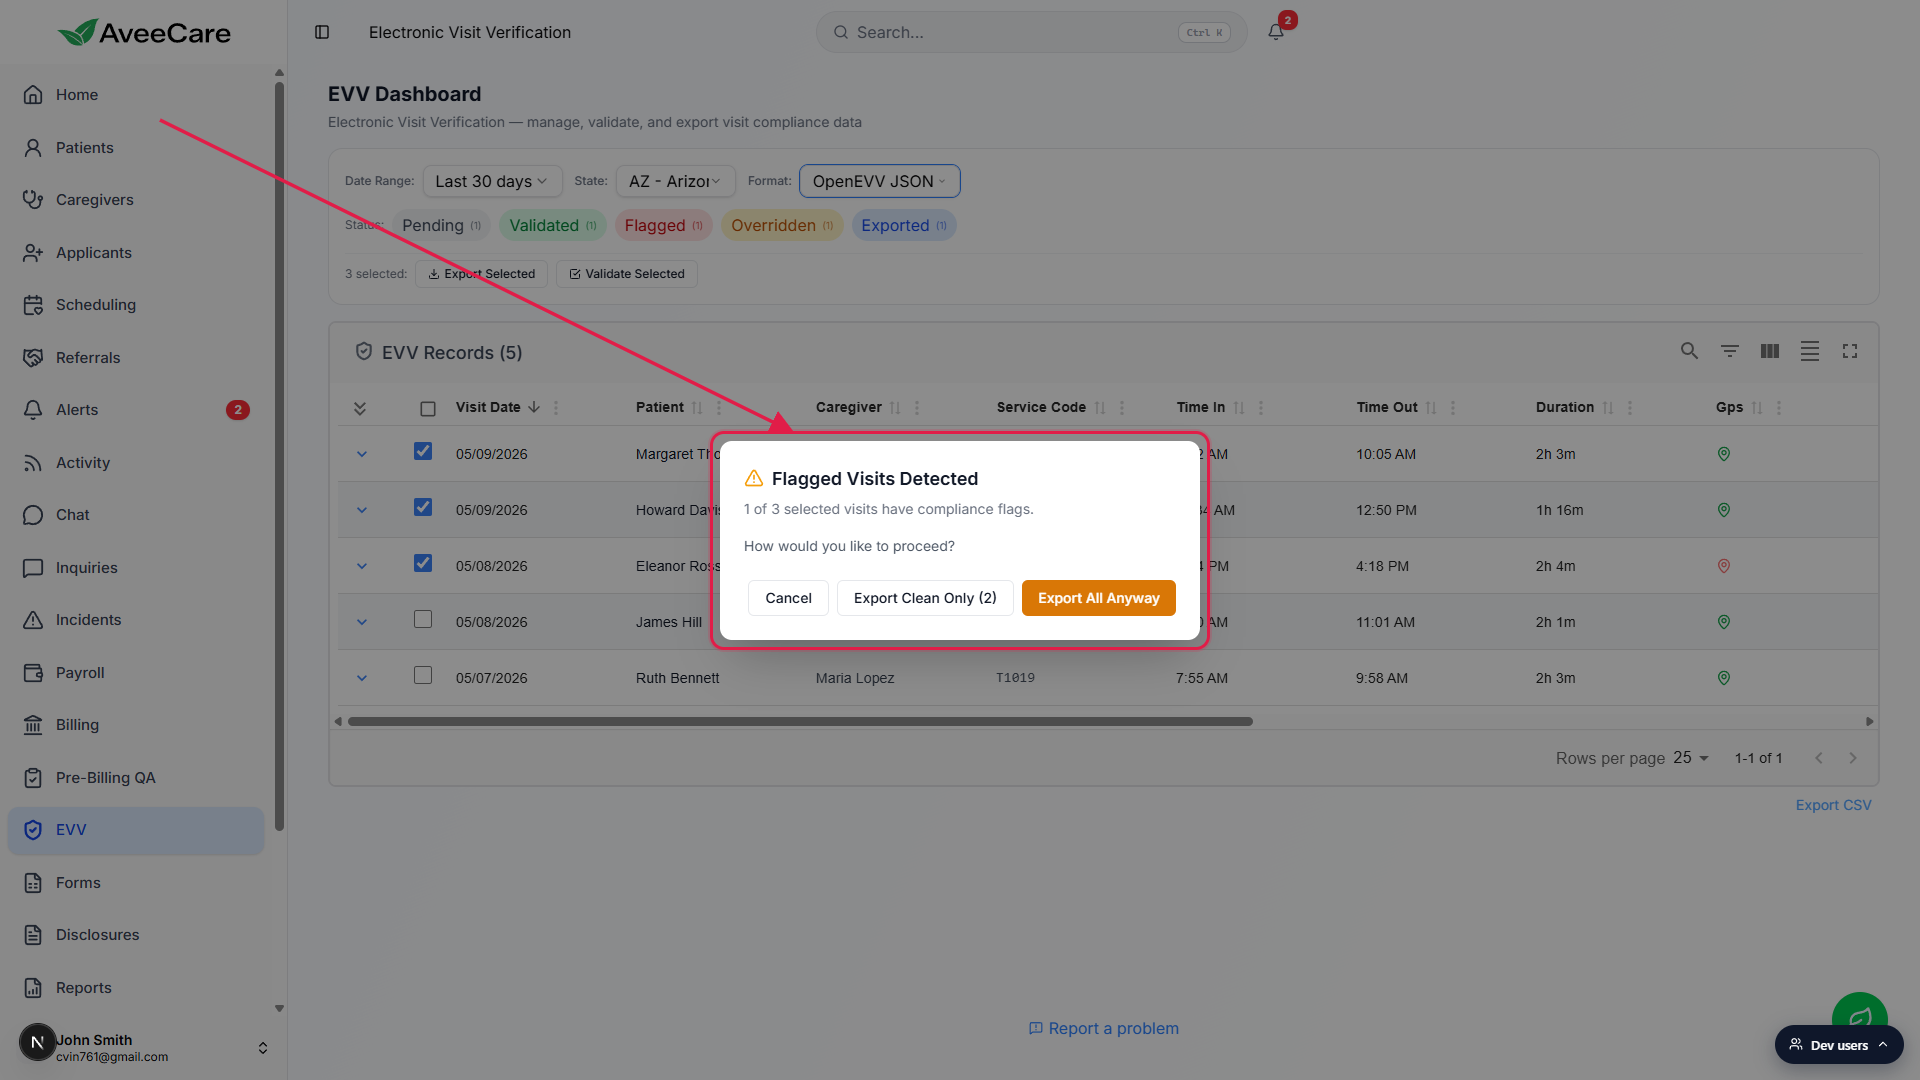
4. Pick an export format and push the file
Open the Format dropdown in the filter strip.
Nine choices ship out of the box: Generic CSV, PDF Report, OpenEVV JSON (Sandata), HHAeXchange V5 CSV, EDI 837P Claims, AuthentiCare (Conduent), Netsmart / Tellus, Therap Services, and CareBridge. Changing the State filter auto-switches Format to that state's default aggregator, which you can override.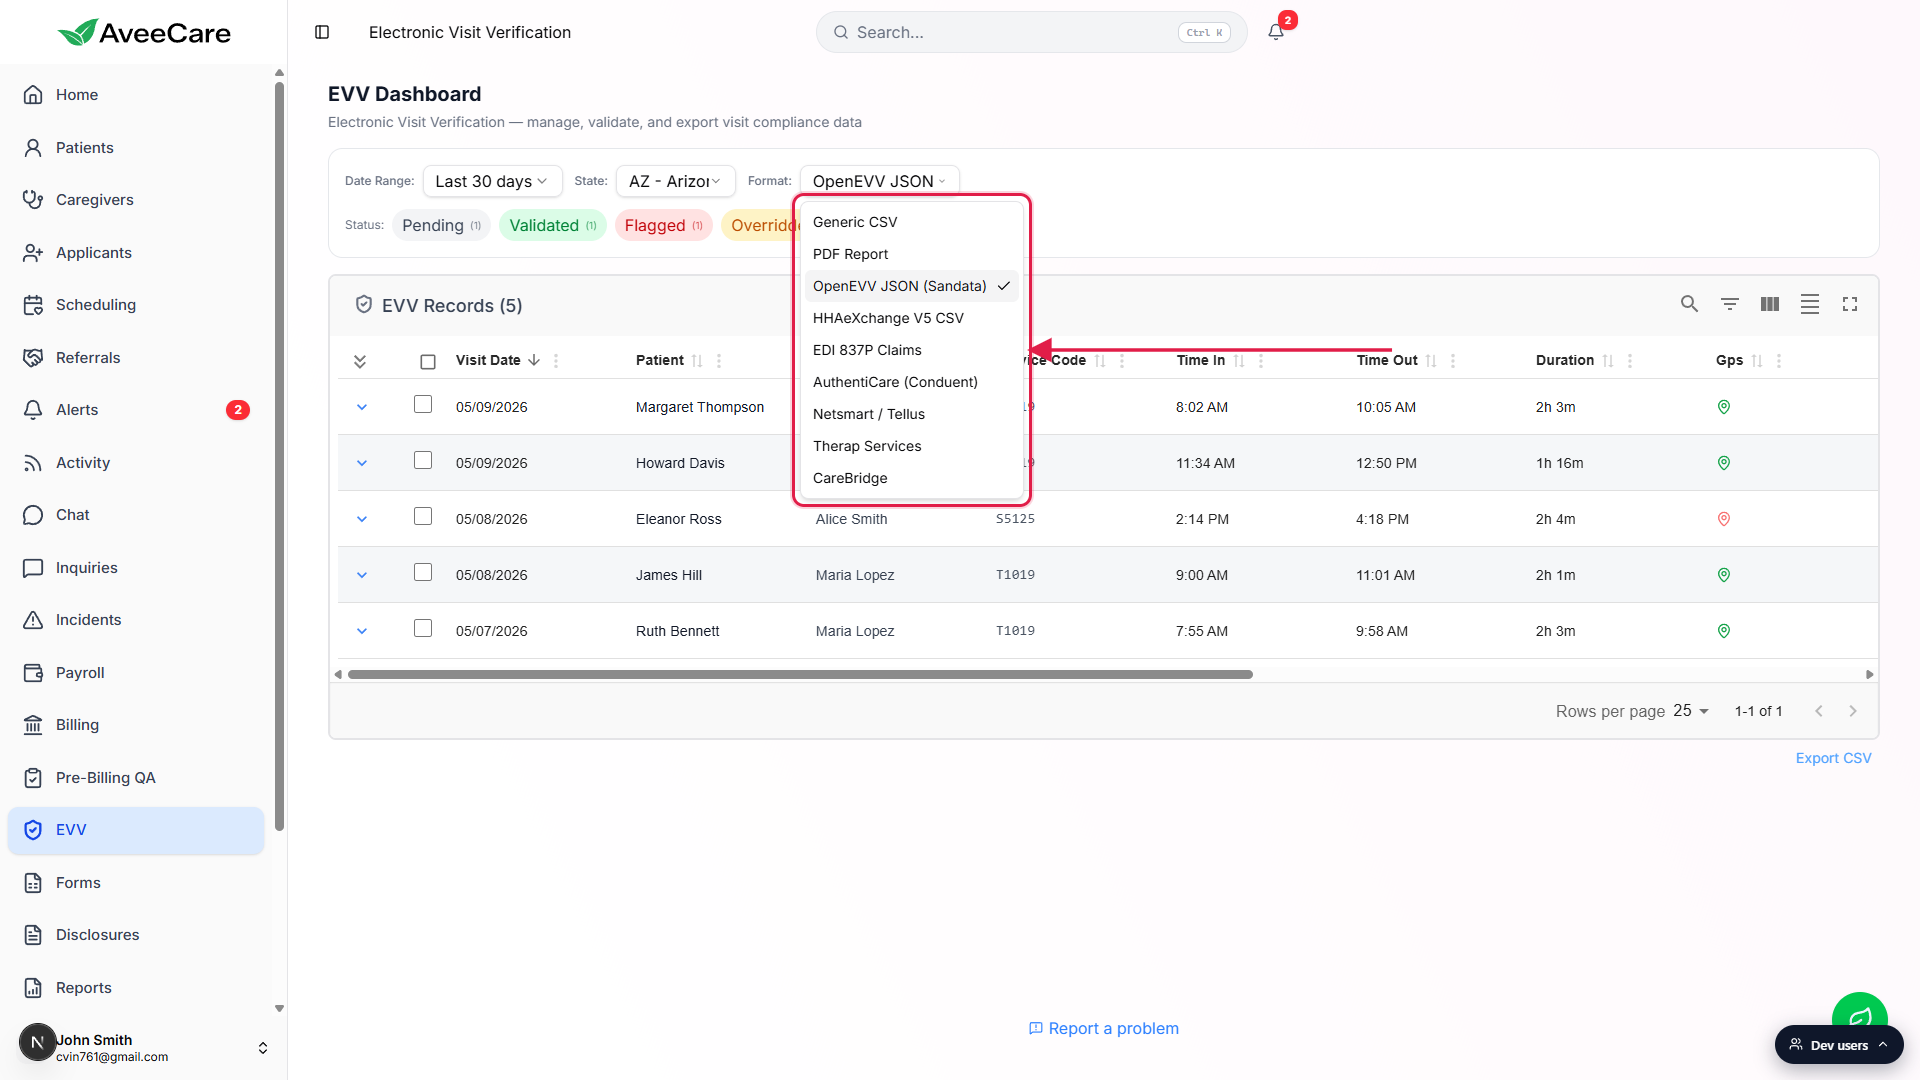
If any selected row is Flagged, the warning dialog gates the export.
The Flagged Visits Detected dialog says how many of your selected rows have compliance flags and offers three buttons: Cancel backs out and changes nothing, Export Clean Only exports the unflagged subset and leaves Flagged rows for you to fix, and Export All Anyway (amber) pushes everything including flagged rows to the aggregator. Aggregators usually reject flagged submissions, so the clean-only path is the right default.Confirm the download and let the row statuses flip.
The file lands in your browser's default download folder named after the format (a CSV, a PDF, a JSON, a 837P claim file). The selected rows flip to Exported status with an evvExportedAt timestamp and the format code saved on each row. A success toast reads how many visits exported and whether any aggregator-specific warnings fired.
Common pitfalls
- Format does not match the state contract. Changing State auto-switches Format to that state's default aggregator. If you previously hand-picked a different format, set the State first, then re-pick the format. Exports run against whatever Format is currently selected, not the state default.
- Exporting Flagged rows on purpose. The Export All Anyway button will push flagged visits to your aggregator. Most aggregators bounce them back and the rejection report ends up with your state contact. Prefer Export Clean Only and resolve flags first.
- Validate is not the same as Override. Validate re-runs heuristics and flips the row to Validated only when they pass. Override is for acknowledging a real flag with a reason and sending the row through anyway. The flag itself is not removed when you Override.
- Rows missing from the table. The EVV Records table only loads visits where status is Completed. If a visit is still In-Progress, Scheduled, or Cancelled it will not appear here. Check Scheduling for visits stuck in another status.
- Checkboxes only select the current page. Page size defaults to 25. If you have 60 completed visits in the window and want to export them all, raise the page size in the bottom-right Rows per page dropdown before checking the header checkbox.