AveeCare does not have a separate Claims tab. The Billing page is one Visit Billing worktable, and the claim controls sit on the same page: the EDI File Export card above the table for batch work, plus a small shield button in each visit row for per-visit claims. Each visit row also shows the live claim status in the Status column as the clearinghouse responds.
Quick answer
Open Billing from the left nav. There is no Invoices vs Claims tab strip. To submit a single claim, click the small blue shield icon in the Actions column on any visit row whose patient has insurance, fill out the CMS-1500 wizard, and submit. For batch clearinghouse work, use the EDI File Export card above the table: Batch Generate 837P, Batch Generate 837I, and Import 835 ERA.
Where claims live on the Billing page
- EDI File Export card. A horizontal card above the Visit Billing table with Batch Generate 837P, Batch Generate 837I, and Import 835 ERA. Use this for clearinghouse submission and ERA reconciliation in bulk.
- Per-row shield button (Actions column). Small blue IconShieldCheck button that reads Generate insurance claim (837P) on hover. Only appears on visits whose patient has insurance on file. Opens the CMS-1500 Professional Claim (837P) wizard for that visit.
- Status column badges. Once a claim has been submitted, the Status column shows Submitted, Acknowledged, Rejected, Denied, or Paid (Stripe-paid rows show Paid too). Rejected and Denied badges are clickable and open a rejection detail modal.
- Check for Responses. When a clearinghouse connection is wired up, a Check for Responses button appears between the EDI card and the table. It pulls the latest 277CA / 999 / 835 responses back so the Status badges update.
1. Open Billing and find the claim controls
Click Billing in the left nav.
You land on the Visit Billing worktable, not on a separate tab. There is no Invoices vs Claims tab strip anywhere on this page.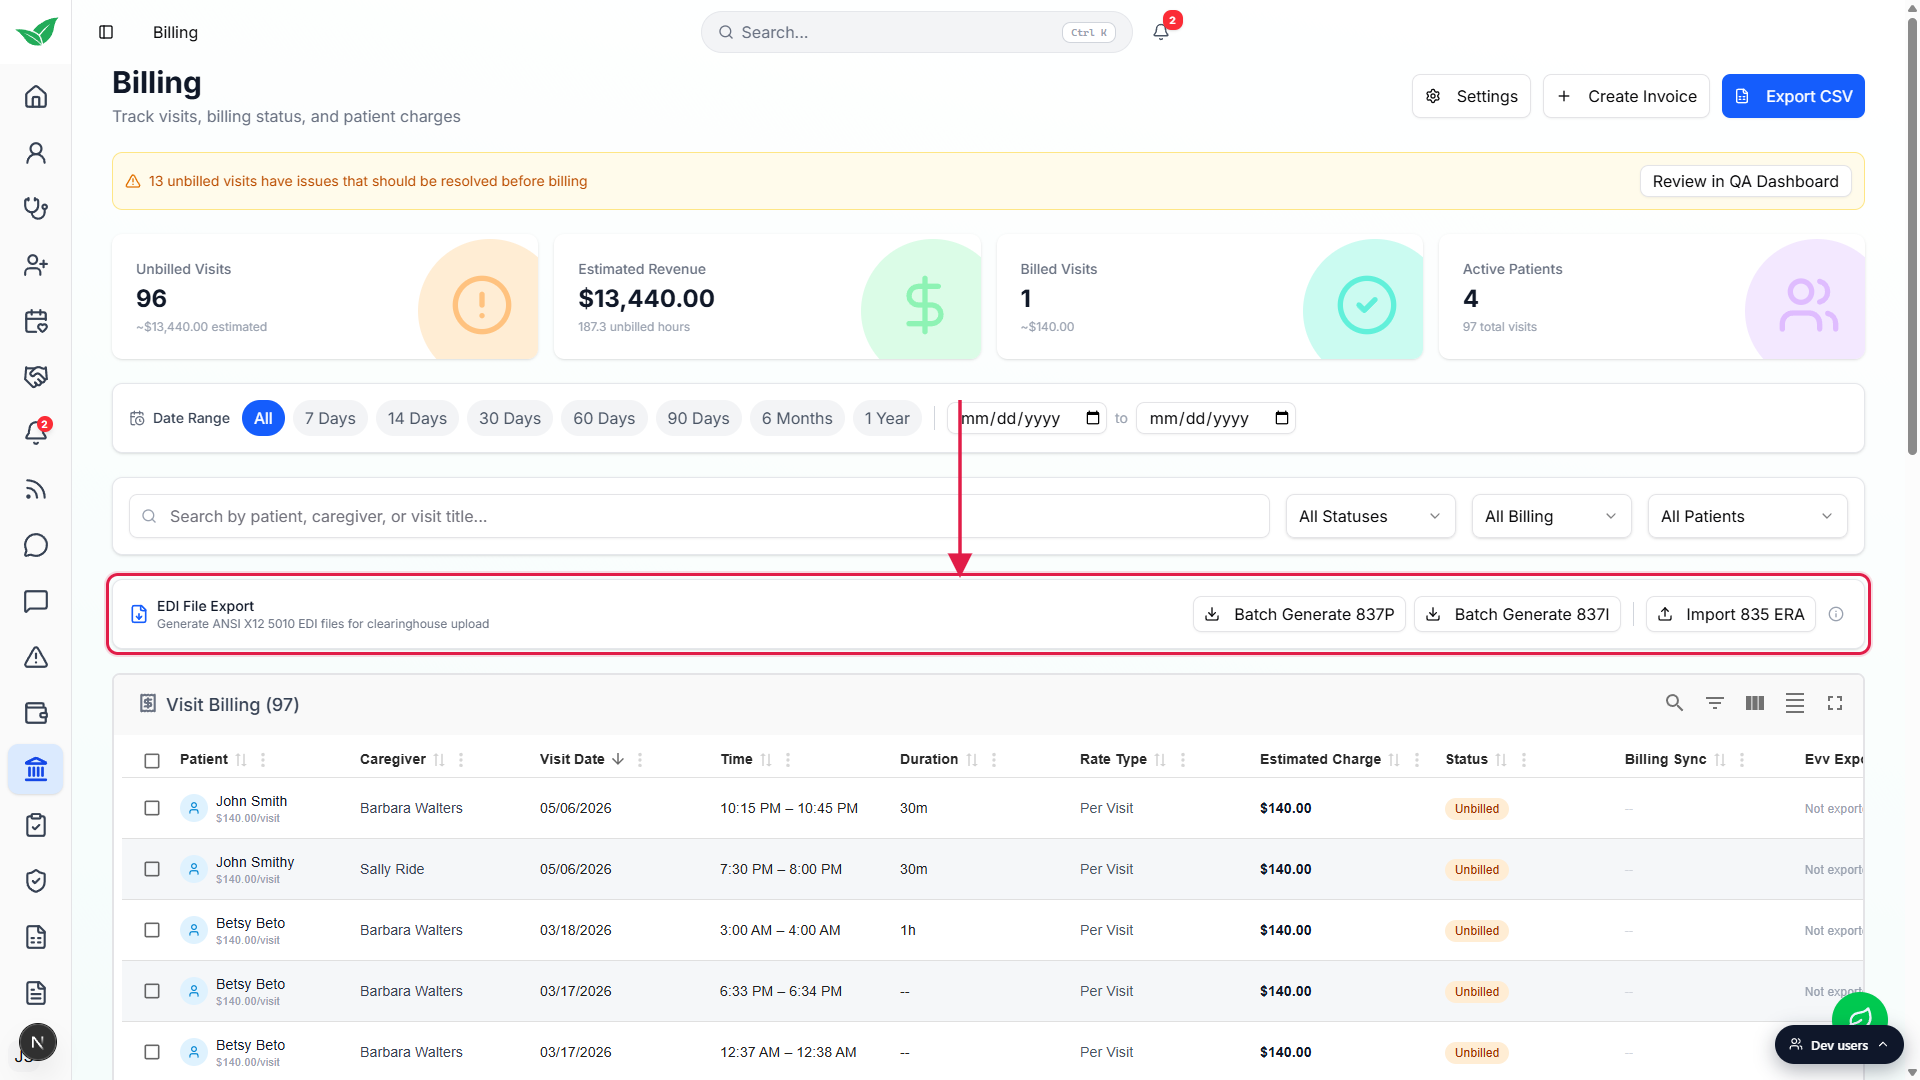
Scan the EDI File Export card above the table.
This is the batch claim surface. Use it when you want to send every billable visit from the current filter to your clearinghouse in one file, or to pull a payer's 835 ERA back in.
2. Generate a single claim from a visit row
Scroll the Visit Billing table right to expose the Actions column.
On a 1080p screen you may have to scroll the table horizontally. Actions sits at the far right after EVV Exported.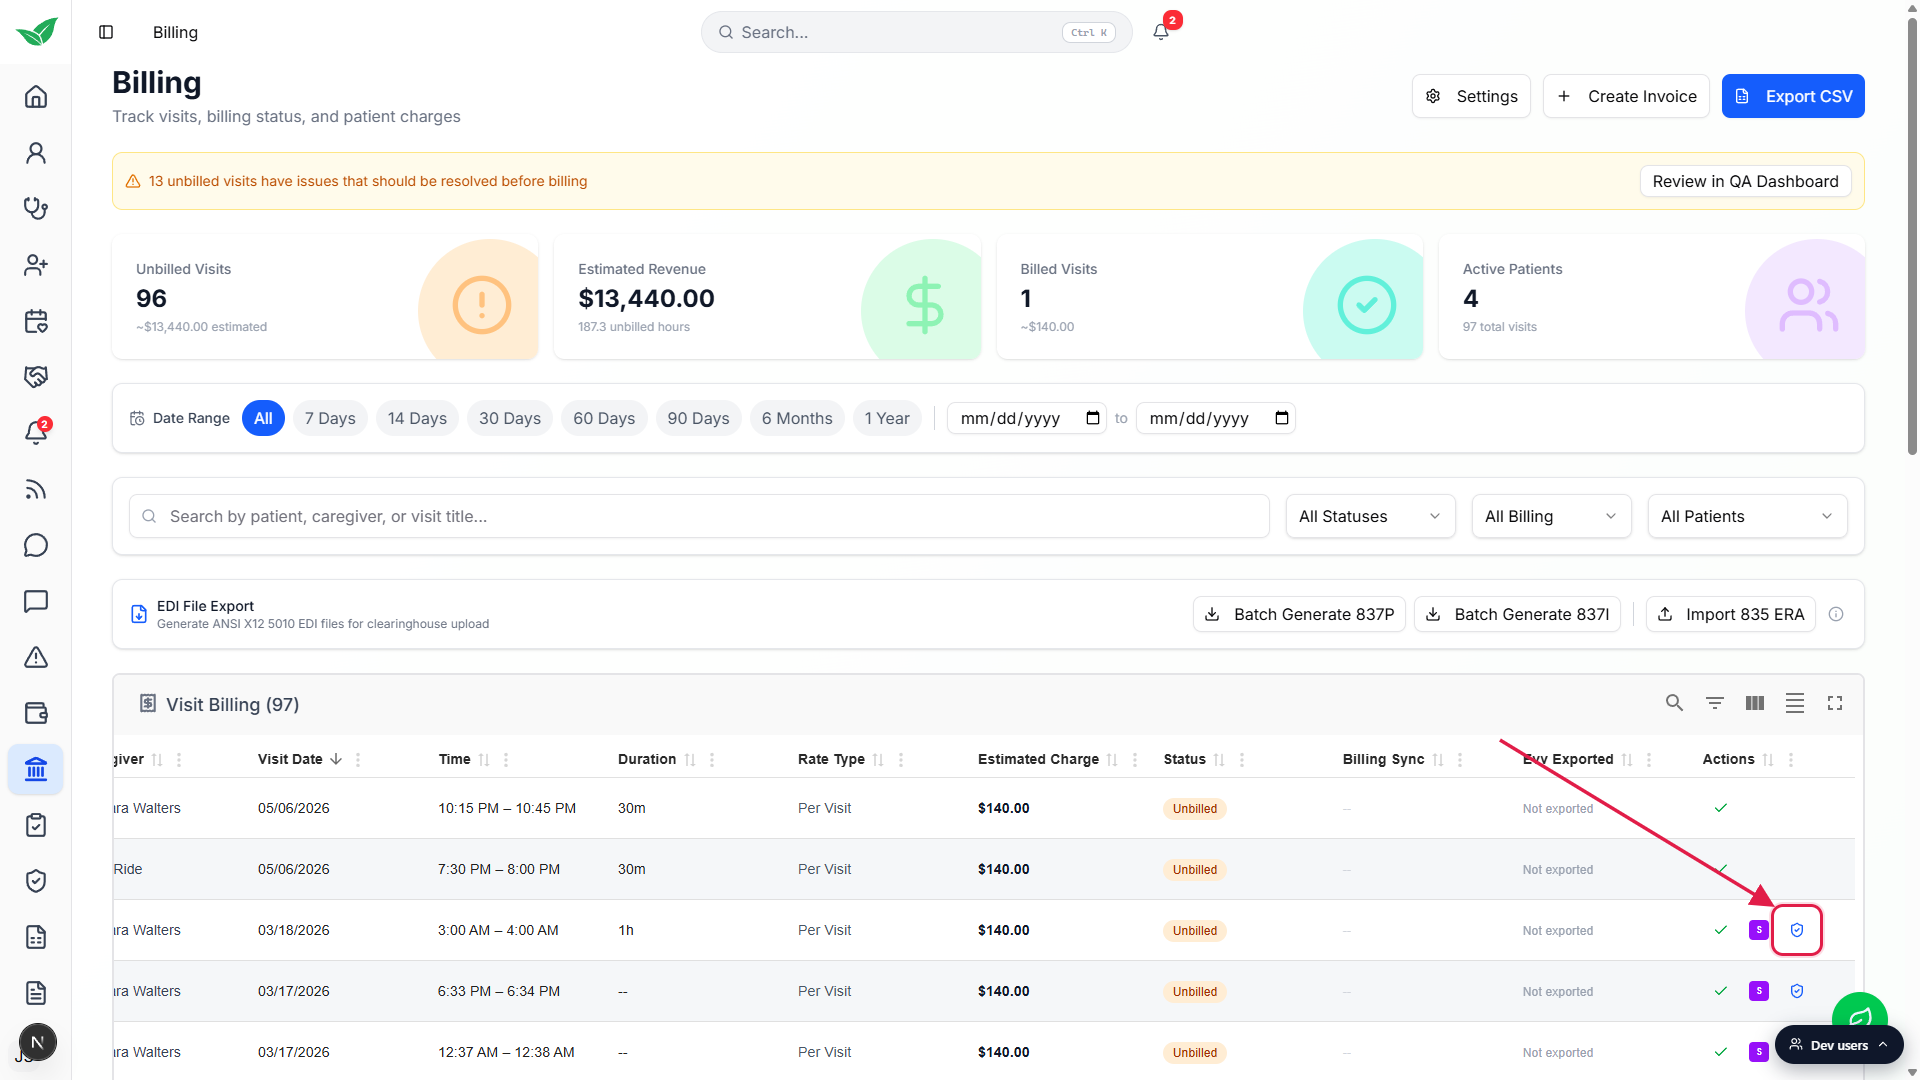
Click the small blue shield icon on a row whose patient has insurance.
The hover title reads Generate insurance claim (837P). Rows whose patient has no insurance on file do not show this icon. Add insurance on the patient's Insurance tab first if you need it.Fill out the CMS-1500 Professional Claim (837P) wizard.
The modal opens on the Simple tab with three steps: Select, Clinical, Review. Pick the visits you want on the claim, work the Readiness Check (Patient Demographics, Billing Provider, Rendering provider, Insurance Info, Service Facility), add clinical codes, then Review and submit. The deeper field surface is on the Advanced tab if you want every CMS-1500 box.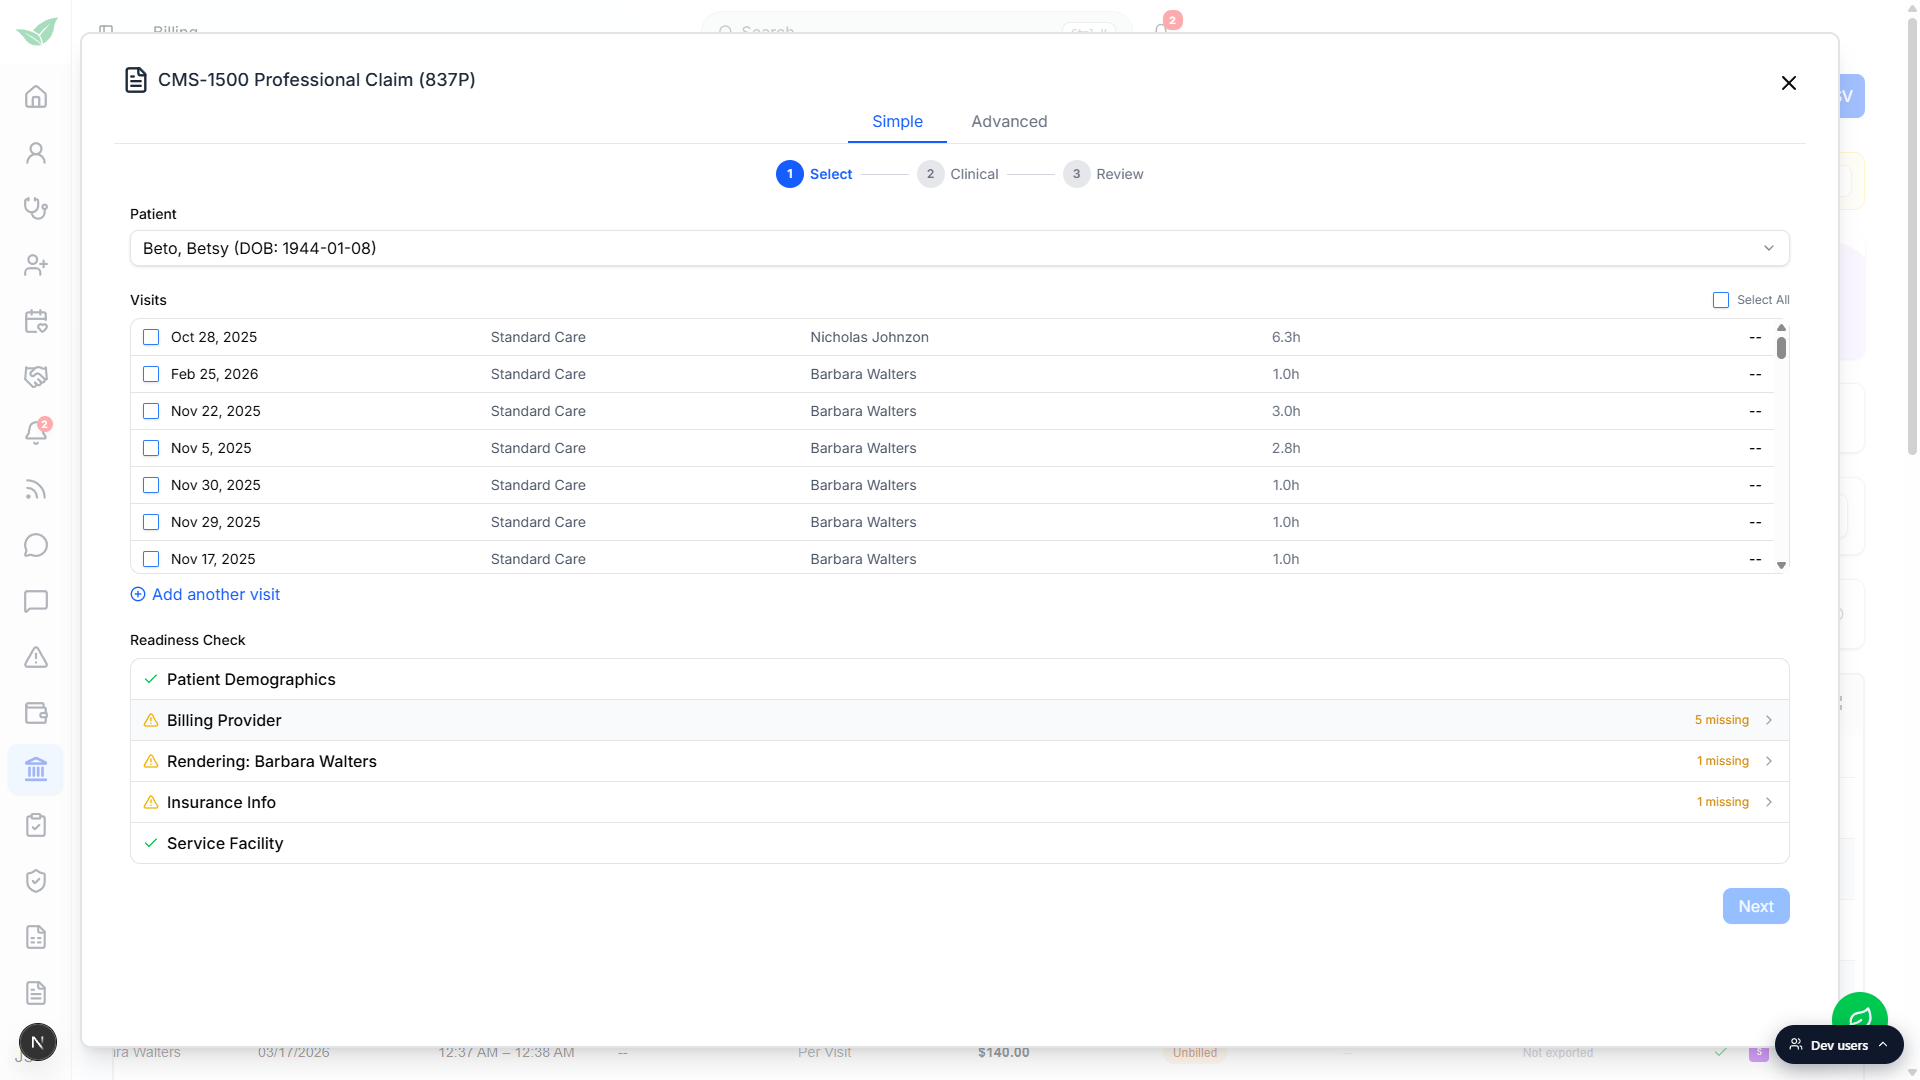
3. Batch-generate or submit 837 files
Set the table filters to the visits you want on the file.
Date Range chips (All, 7 Days, 14 Days, 30 Days, 60 Days, 90 Days, 6 Months, 1 Year), All Statuses, All Billing, and All Patients all scope the EDI export. If you want only this week's Medicaid visits, set Date Range to 7 Days and All Billing to Medicaid before clicking the EDI button.Click Batch Generate 837P for professional claims or 837I for institutional.
AveeCare bundles every eligible visit into a single ANSI X12 5010 EDI file and downloads it. Upload that file to your clearinghouse portal (Availity, Trizetto, Office Ally, Optum, Waystar). If you have a Submit 837P / 837I button next to the generators, you are connected directly to a clearinghouse and AveeCare can ship it for you instead.When responses come back, click Check for Responses or Import 835 ERA.
The clearinghouse will return 277CA / 999 acknowledgments and eventually 835 ERA remittances. Check for Responses pulls everything new from a connected clearinghouse. For portal-uploaded files, download the 835 from the payer and drop it into Import 835 ERA. AveeCare matches payments back to the visits and updates the Status badges. See the ERA files (835) article for the full ERA workflow.
4. Handle rejected and denied claims
Watch the Status column for Rejected or Denied badges.
After submission, the Status chip moves through Submitted, Acknowledged, and finally Paid (or Rejected / Denied if the payer pushes back). Rejected and Denied badges are clickable and styled with a red hover ring; the rest are tooltip-only.Click the red Rejected or Denied badge to open the rejection detail modal.
The modal shows the original outbound 837 and the inbound response file from the clearinghouse, plus the payer's denial codes for that claim. From there you can fix the issue and resubmit, or void the claim if it should not have been billed at all.Click Resubmit on the rejection modal to reopen the CMS-1500 wizard.
The claim is moved back to Validated state and the wizard reopens with the previous data preloaded. Fix the field that caused the denial, walk back through Readiness Check, and submit again.
Common pitfalls
- Looking for a Claims tab. There is not one. /billing opens on the Visit Billing worktable directly. The claim controls are the EDI File Export card above the table and the small shield button on each insurance-eligible row.
- No shield icon on a row. The Generate insurance claim button only shows up when the patient has insurance on file. If a visit you expect to bill insurance for has no shield, the patient is missing an insurance record. Add one on the patient's Insurance tab and refresh.
- Forgetting that filters scope the batch. Batch Generate 837P and 837I run against the current filter window. If your Date Range is set to 7 Days, you only get the last 7 days in the file. Set the filters first.
- Submitting before the Readiness Check is green. The CMS-1500 wizard's Readiness Check shows which CMS-1500 segments are missing (Patient Demographics, Billing Provider, Rendering, Insurance Info, Service Facility). Clear the warnings before clicking Submit, or the payer will reject the claim and you will see it come back as Rejected in the Status column.
- Treating Status and Billing Sync as the same thing. Status (Unbilled, Billed, Submitted, Acknowledged, Rejected, Denied, Paid) is AveeCare's view of the claim and invoice lifecycle. Billing Sync is whether the visit was pushed to a third-party platform like QuickBooks, ADP, Paychex, or Gusto. They move independently.